
Aadhaar Card Download: bY
- Aadhaar Number Only
- Enrolment Number (EID)
- Virtual ID (VID)
- Name And Date Of Birth
- Mobile Number
- Without Mobile Number
- m-Aadhaar App
Convey: UIDAI Latest Updates
Aadhaar Card Download: 7 UIDAI Modes To Download e Aadhar Card
- September 12, 2019
- Posted by: Editorial Team
- Category: Aadhaar Card

Aadhaar Card Download: Overview
Welcome to LeadingFile’s UIDAI guide on “How To Download And Print Aadhaar Card Online”.
So, what are you waiting for? Let’s begin with a real case study…
Firmly if I tell you to follow 10 simple steps to download aadhaar card, I know you won’t do it, wouldn’t even see it.
Hell, even I wouldn’t. It’s just too much work.
But in the spirit of simplicity, just go through this guide and you’ll get your e-aadhaar card for FREE.
I deal – your race is definitely going to be ended here. If not then I will help you to download your e-aadhar and even will overcome your [simple_tooltip content=’Aadhaar Card Amendments be like;
- First — The correction of aadhaar holder name (might it be the first name or surname or the entire name),
- Second — The correction of aadhaar holder father’s name (also might it be the first name or any other),
- Third — The correction of aadhar holder address or whatever.’]aadhar card amendment[/simple_tooltip] for free.
That’s how confident I am that it works.
Actually the statement has its own standby and i.e – the guide subsumes 7 UIDAI methods to download e aadhaar card. So, no matter which method fails but one is definitely going to rock.
On & On, this guide is certainly one stop solution to a range of aadhaar services, resources and news.
News: A big relief for ITR taxpayers in the sector of Aadhaar and PAN linking is here… Hurray, the last date of linking aadhaar card with PAN card has been extended from 31st March to 30th Sep 2019.
All right! But what’s the need for aadhaar card download?
Why One Need To Download Aadhaar Card
Awfully, aadhar is somewhat — “Mera Aadhaar, Meri Pehchaan”…!!!
Not only that but it is also a 12-digit unique identification number that is issued by the UIDAI (Unique Identification Authority of India) to all the citizens of India.
Fine, but what if data filed within the aadhaar card gets wrong. Don’t you think all the details will be in vain? Chances are, but details aren’t the fumes which will disappear within seconds.
Hmm… cool fact. So what’s the way to overcome this issue.
In order to rescue and refine all the details of aadhaar card, aadhaar card amendment (aadhaar card updation || aadhaar card correction) is required.
Wait-Wait-Wait, at this point, one suffers from the aadhar card download need. Have a depth view from starting…
Generally, after enrolling and receiving the aadhaar card, we get the filled details incorrect and sometimes it even happens that we lose the aadhaar card.
To this point, we look for the aadhaar card updation or so-called aadhar card amendment. Upon making the updation, we just have to wait for the new aadhaar card. And the reason beyond waiting is: new aadhar card needs to be mailed by the government of India on your postal address. Needless to mention that this on-going process usually takes a couple of weeks and sometimes a month or two to be completed.
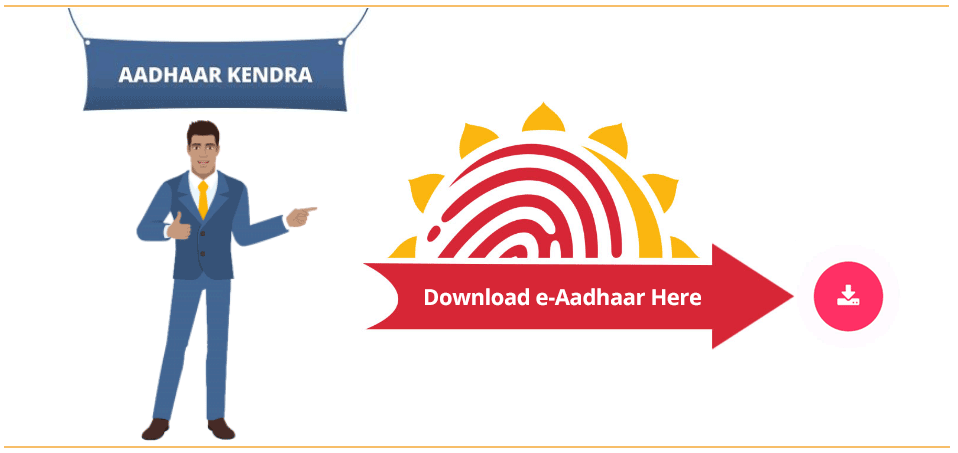
Until what? Nothing big, just download a digital copy of your new aadhaar card online, which we call e-aadhaar from the self-service portal of the UIDAI or the Enrolment/Update Center.
Time and again, you might be glancing at e-aadhaar and often might be thinking; what is e-aadhaar? Well, it is nothing but an electronic version of your aadhaar card or just say it a copy of your aadhaar but remember electronic and not the original which come by post.
Note: Carry Your Aadhaar On Your Mobile – Download mAadhaar App…!!!
** Get It On Google Play & App Store **
Ok-Ok! But what if I think of downloading e-aadhaar card right now, how would I download it. Don’t panic, the ways to download e-aadhaar card is here, keep going…
Aadhaar Card Download By Aadhaar Number Only: Secret Steps
Did you find the way of “downloading e-Aadhaar card by aadhaar number” mysterious?
If really so then a path to your mystery (e-aadhaar card download by aadhaar number only) is here.
Mark: Don’t panic, later to the aadhaar card download guide, we will also discuss the print aadhaar formula. Somewhat, we aren’t going to leave your hand till the end of all.
Sounds cool.
But does it goes the same way?
Yes, it does! An answer to this is as follows…
With huge relief, finally, now you need not to worry about your aadhaar card. Really? Yup! Now one is not supposed to keep his or her identity card safe or always with himself or herself. Just remember or note down your aadhaar number, later either play with it or forget it or lose it. No worries, you will find it soon.
Literally, it’s good news. But, what’s the game beyond this all? Nothing big, just a simple download process needs to be followed out.
Yah, you heard it right, just a single download process can help you out of this all.
Time and again, we are here with several new modes to the outcome of this issue, and i.e — Online Aadhaar Card Download.
But here we are only supposed to discuss — how to download aadhar card online by aadhar number only/-
Remember: To be able to go with the process of downloading aadhar card via aadhaar number only, you must have two things:
- Aadhaar Number.
- A Mobile Number Registered With UIDAI.
However, both are equally important – as you would require both;
Aadhaar Number — In order to rectify that the aadhaar belongs to you.
On the other hand; Mobile Number Registered With UIDAI — In order to receive OPT (One Time Password) for downloading e-aadhaar card.
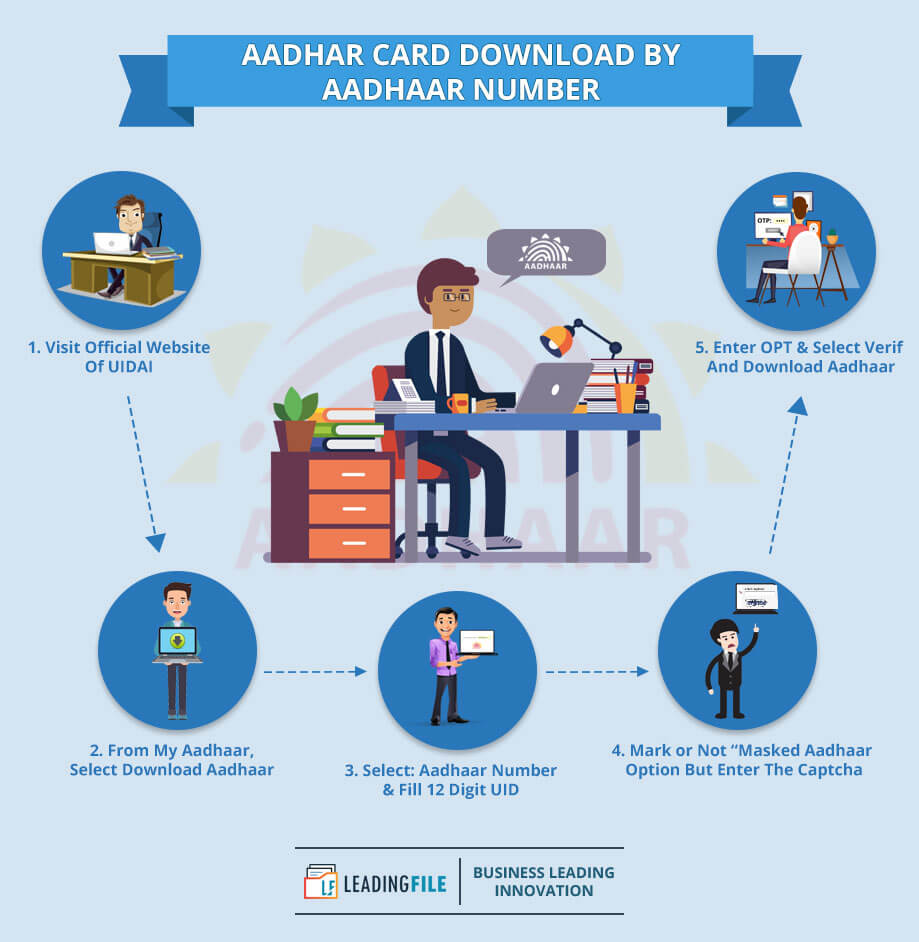
Finally, the steps to aadhar card download by aadhaar number only are as follows:
- Visit Official Website Of UIDAI
- From My Aadhaar, Select Download Aadhaar
- Select: Aadhaar Number & Fill 12 Digit UID
- Mark or Not “Masked Aadhaar” Option But Enter The Captcha
- Enter OPT & Select Verify And Download Aadhaar
Now, let’s discuss these points along with the infographics and GIF representation in detail, as…
![]()
Visit Official Website Of UIDAI
To first, here your presence makes it translucent clear that you have been issued with an aadhaar card and you also have your aadhaar number with you.
Not only that but you also have your number registered with UIDAI (Unique Identification Authority of India).
So, under this alternative step – what you need to do is visit the official website of UIDAI.
It will look somewhat like this…

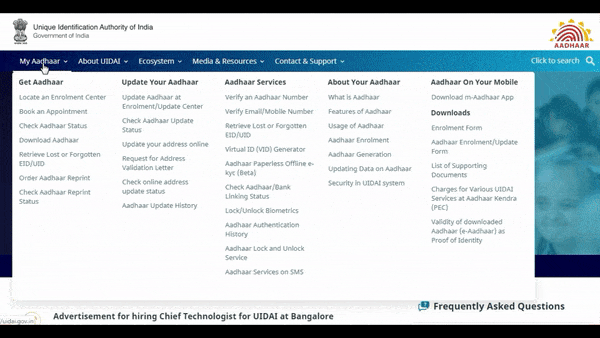
By reaching this screen, just scroll your cursor (take you mouse pointer) to the “My Aadhaar” button. Following this will open a drop-down menu list.
Have a look at the list and upcoming screen via the GIF, as follows…

![]()
From My Aadhaar, Select Download Aadhaar
Yes, from the above-represented screen you need to select the “Download Aadhaar” option. It seems to be there only under the “Get Aadhaar” menu list.
The list contains the following options…
- Locate an Enrolment Center
- Book an Appointment
- Check Aadhaar Status
- Download Aadhaar ->
- Retrieve Lost or Forgotten EID/UID
- Order Aadhaar Reprint
- Check Aadhaar Reprint Status
Among these options, you have to select the “Download Aadhaar” option. Upon selecting this option, you will face a new tab with a new screen with several options to download the aadhar card.
Have a look at the same via the GIF, as follows…
![]()
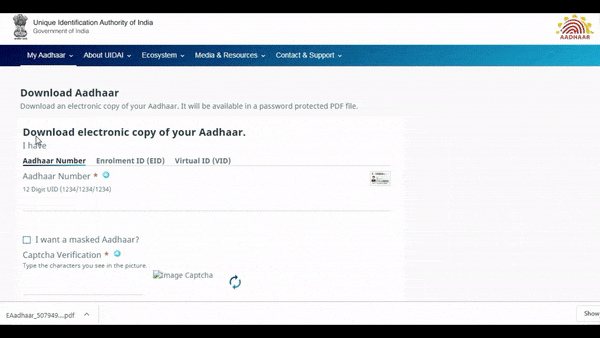
Select: Aadhaar Number & Fill 12 Digit UID
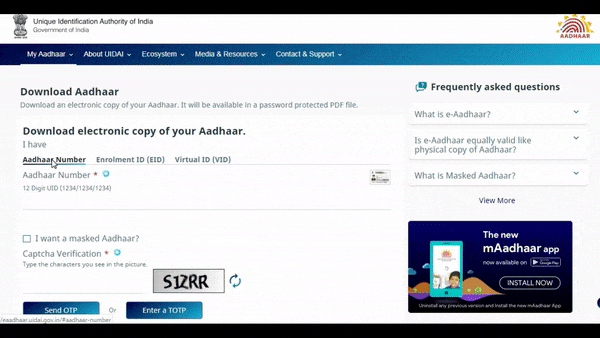
As mentioned in step 03; Upon selecting the “Download Aadhaar” option, you will face a new tab with a new screen with several options to download the aadhaar card, here they are; under “Download electronic copy of your aadhaar” heading.
- Aadhaar Number ->
- Enrolment ID (EID)
- Virtual ID (VID)
From these points, select the “Aadhaar Number” option. Though itself selected option is also aadhaar number, but just confirm it for once whether the selected option is aadhaar number or not.
Upon confirming, fill the 12 digit UID (Unique Identity – like 1234/1234/1234) or so-called your aadhaar number.
It seems to be confusing, right? Ok, let me make it easy for you: have a look at the GIF representation…
![]()
Mark or Not “Masked Aadhaar” Option But Enter The Captcha
Yes, upon filling your aadhaar number (12 digit UID) you have been asked to mark an option, named “I want a masked Aadhaar”.
Well, it is not mandatory to select this option. But selecting this will enable you to download your aadhaar card with only the last four (4) digits being visible.
On the other hand, if you don’t select this option then you will be allotted with a regular aadhaar card (a formal aadhaar card with all 12 digits being visible).
What next? Next is to fill the captcha which is provided just aside of the blank space to fill with.
Upon filing the captcha, hit (press) either option “Send OTP” or “Enter a TOTP” OR “Face Auth”. Wherein, if you hit the “Send OTP” option then you will receive a six (6) digit code on your registered mobile number.
Note – 01: Remember that the OTP (OPT full form is — One-Time Temporary Password) will be valid for 10 mins only/-
Whereas, if you hit the “Enter the TOPT” option then you will receive an 8 digit long numeric string on your same registered mobile number.
Note – 02: Remember that the TOTP (TOPT full form is — Time-based One-Time Temporary Password) will be valid for 30 seconds only/-
And if you hit the last one i.e “Face Auth” (option to come soon) then you will be asked to ensure the following conditions…
- Firstly ensure you are in the correct lighting.
- To second — stay still for the smooth capture of your face.
- To third — allow the browser to use your device’s camera.
- Click ‘OK’ to continue.
It’s just too much work. So, avoid these all options and select the “Send OTP” option.
Note – 03: Remember that the Face Auth (Face Auth full form is — Face Authentication) will be placed only if found to be following the above-mentioned points.
Finally, in order to view the complete process of doing the same, visit the GIF attached-above with the step 3rd (third).
![]()
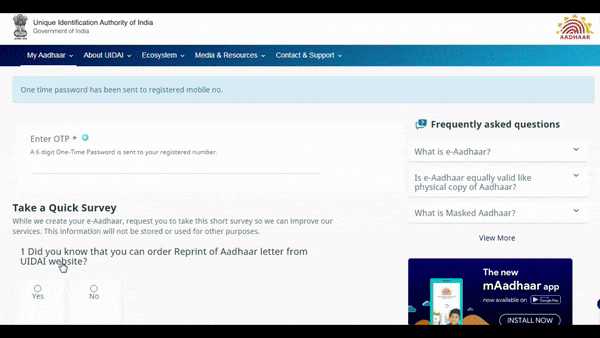
Enter OPT & Select Verify And Download Aadhaar
The time you will hit either option “Send OTP” or “Enter a TOTP”, you will face a new screen each time, asking you to provide the OTP or TOTP.
So, no matter what you press, just enter what you received and scroll down to look for the “Verify And Download Aadhaar” option.
However, in the way of scrolling, you will be asked to take a quick survey.
Mark: The survey part is mandatory and till the UIDAI creates your e-Aadhaar, they request you to take this short survey so that they can improve their services.
Not only this, they assure you that they will keep all your information confidential.
The survey part asks you to deal with only two (2) questions, where the first question contains two options and the second contains five (5) options, mentioned as follows…
Q -01: Did you know that you can order a reprint of your aadhaar letter from the UIDAI website?
- Yes ->
- No
To this, the answer is Yes. Of course, one can order a reprint of his/her aadhaar letter from the UIDAI website.
Now, let’s jump over to the next question, as follows…
Q – 02: In how many days did you receive the reprinted aadhaar letter after getting SMS from India post?
- Within 5 working days ->
- 6-10 days
- 11-15 days
- More than 15 days
- Did not receive
To this, the answer is – “Within 5 working days”. Yes, within 5 working days one can receive his/her reprinted e-aadhaar letter after getting SMS from India post.
All right.
What next? Next, later to survey, you have to look for the option “Verify And Download Aadhaar”.
However, to this I will say — the time you find it, click it.
Have a look here…
Doing so will immediately send you a message to the registered mobile number like –
Dear whatever, 1234/1234/1234/1234 is the virtual ID for your Aadhaar number: 1234/1234/1234, generated at <the following date>< the following time>.
And upon this, automatically your e-aadhaar will start downloading or it will ask you to save it with whatever name.
All done! Congratulations your aadhaar card has been downloaded within the PDF format.
Remark: Now you have your e-Aadhaar in the PDF format but do you know it is password protected.
Don’t panic with the password, the secret of this password is discussed in the section of print aadhar.
It was quite easy to deal with this formula of downloading aadhaar card with aadhaar number only but what if one fails to the conditions of this guide.
Not a big deal, just scroll down till the end. I deal, any of the formulae is definitely going to match his/her terms.
This time, have a look at the guide on how to download aadhaar card by enrolment ID (EID).
Aadhaar Card Download By Enrolment Number: Wander The Coolest Way
Certainly, aadhar card download by enrolment number only is the coolest way ever in the history of aadhaar card download.
And why it is so? The reason is clear: this method allows you to download your aadhaar card if you have lost it and even if you haven’t received it yet.
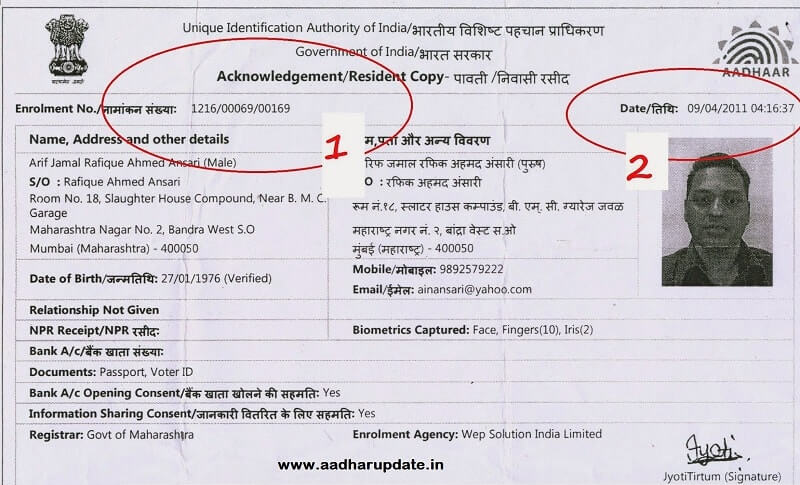
Remember: To be able to go with the process of downloading aadhar card via enrolment number, you must have your “Aadhaar Enrolment Slip/Acknowledgement/Resident Copy”. Similar to this one…

Somewhat, aadhaar card download by enrolment number comes with the solution of two problems, at a single time.
Well, I do agree that aadhaar card can be downloaded in numerous ways and all are the finest methods. But when it comes to aadhar card download by enrollment number only then somewhat we are about to wander the coolest.
Don’t you think so? Too bad.
No worries, you will agree to it today by reading this guide on how to download aadhar card by enrolment number. Here we go…
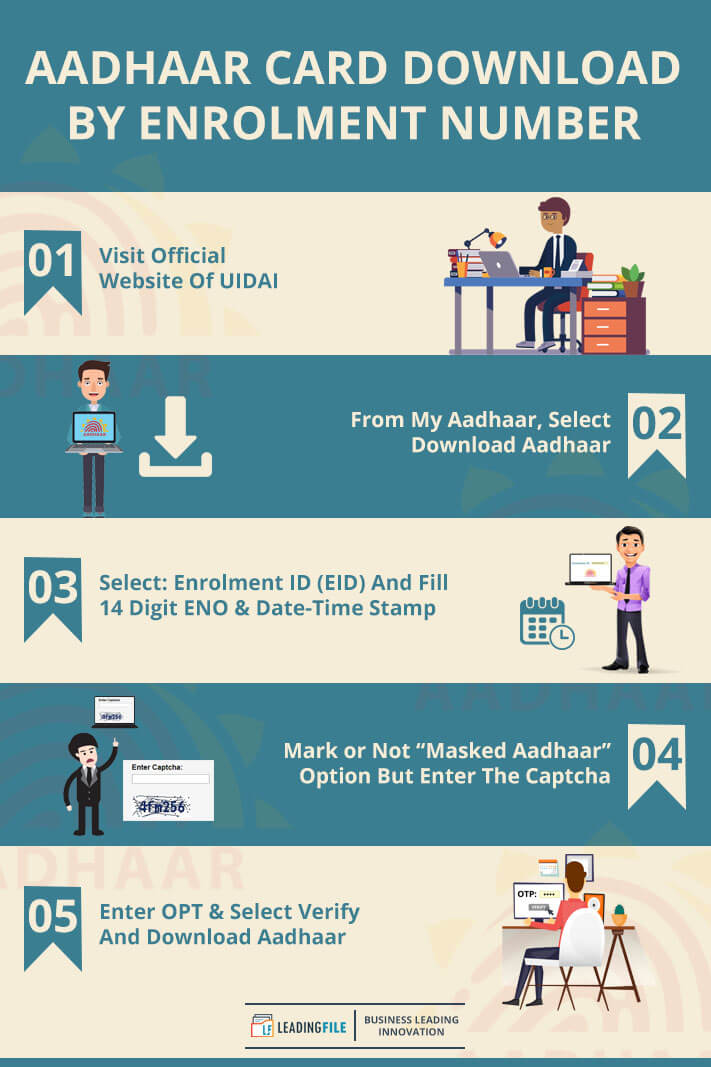
Steps To e Aadhaar Card Download By Enrolment Number
When it comes to e aadhaar card download by enrollment number then it becomes translucent clear that either you have lost your aadhaar card or you haven’t got it yet or you didn’t remember your aadhaar number.
Don’t panic, your aadhaar will be to you within no matter time, just go through the below-mentioned steps…
- Visit Official Website Of UIDAI
- From My Aadhaar, Select Download Aadhaar
- Select: Enrolment ID (EID) And Fill 14 Digit ENO & Date-Time Stamp
- Enter OPT & Select Verify And Download Aadhaar
Now, let’s discuss these points along with the infographics and GIF representation in detail, as…
![]()
Visit Official Website Of UIDAI
In order to visit the official website of UIDAI, go along with the text in blue: Home – Unique Identification Authority of India | Government Of India.
However, once you click over the anchor text, you will face the e-aadhaar official website. To which you need to find the “My Aadhaar” option.
An image to make things quite easy for you is as follows:
To this upcoming screen, as mentioned, you need to look for the “My Aadhaar” option which is located at the menu bar and is the first menu button.
Remember that you need not to click over the button, just take your cursor over it and a drop-down menu list will be to you, illustrating the following options;
- Get Aadhaar
- Update Your Aadhaar
- Aadhaar Services
- About Your Aadhaar
- Aadhaar On You Mobile
- Downloads
Have a look at the list and upcoming screen via the GIF, as follows…
![]()
From My Aadhaar, Select Download Aadhaar
As soon as you find the “My Aadhaar” option, take your cursor over to it and start looking for the “Download Aadhaar” option from the list you have been looking at.
Found it? If not then look by my eyes.
Firstly, find the “Get Aadhaar” option, it is located just down the “My Aadhaar” button. Later, visit the list it provides, as…
- Locate an Enrolment Center
- Book an Appointment
- Check Aadhaar Status
- Download Aadhaar ->
- Retrieve Lost or Forgotten EID/UID
- Order Aadhaar Reprint
- Check Aadhaar Reprint Status
Among these options, you will find the “Download Aadhaar” at number 4th. The time you find it, click it.
As soon as you click it, you will face a new tab with a new screen with several options to download the aadhar card.
Have a look at the same via the GIF, as follows…
![]()
Select: Enrolment ID (EID) And Fill 14 Digit ENO & Date-Time Stamp
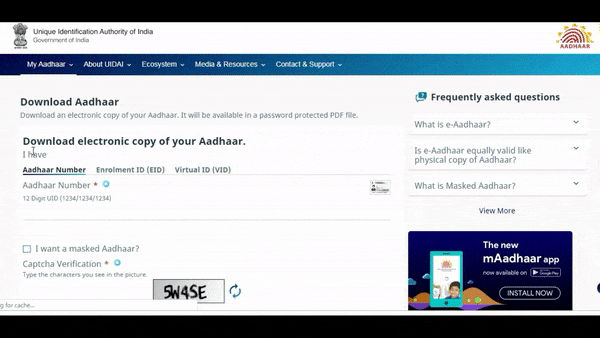
Upon reaching the “Download Aadhaar” screen, you need to select the “Enrolment ID (EID)” option. This option is just next to the “Aadhaar Number” option under the download electronic copy of your aadhaar heading.
The options under this heading are as follows:
- Aadhaar Number
- Enrolment ID (EID) ->
- Virtual ID (VID)
Among all these options, select the 2nd “Enrolment ID (EID)”. The time you will select the mentioned one, it will ask you to provide the 14 digit ENO (Enrolment Number) and 14 digit date-time stamp printed on the enrolment slip.
Fill the same and verify that all the information that you have filled is accurate.
It seems to be complicated, right? Ok, let me make it easy for you: have a look at the GIF representation…
![]()
Mark or Not “Masked Aadhaar” Option But Enter The Captcha
On the way to download aadhar card by enrolment number, the next step is to mark an option, named “I want a masked Aadhaar”.
However, it depends on you to mark it or not. As of, it is not mandatory to mark this option.
But, it has an advantage and i.e security. Somewhat, by enabling this option you can download your aadhaar card with only the last four (4) digits being visible and rest the cross marked.
Though only to this facility it is named masked aadhaar.
On the other hand, if you don’t mark this option then you will be provided with a regular aadhaar card with all 12 digits being visible.
So no matter whether you mark it or not but over the next phase, you need to enter the captcha.
Yes – upon dealing with the masked aadhaar option, you are required to enter the captcha which is provided just aside of the blank space to fill with.
Later to entering the captcha, press either option “Send OTP” or “Enter a TOTP” or “Face Auth”.
To this, I will recommend you to press the “Send OTP” option because it comes with only a six (6) digit code with a validity of 10 mins. Whereas the “TOTP” comes with an eight (8) digit code which is valid for the 30 seconds only/-
Isn’t it too much work? It is. So, in order to avoid this much work, just select the “Send OTP” option.
Understand the entire process of doing the same via the GIF attached-above with the step 3rd (third).
![]()
Enter OPT & Select Verify And Download Aadhaar
Upon receiving the OTP, enter the same and scroll down to look for the “Verify And Download Aadhaar” option.
In the way of scrolling, you will be asked to take a quick survey.
Though the survey part is mandatory and till the UIDAI creates your e-Aadhaar, they request you to take this short survey so that they can improve their services.
Well, they assure you that they will keep all your information confidential.
Mark: To know the answer to the survey part questions, put in your eyes on the last section of aadhaar card download by aadhaar number only guide.
Later to the survey part start looking for the “Verify And Download Aadhaar” option.
To this I will say — the time you find it, click it. Because only when you click it, you will be sent a Virtual ID via the message to the registered mobile number.
The message will be something similar to this;
Dear whatever, 1234/1234/1234/1234 is the virtual ID for your Aadhaar number: 1234/1234/1234, generated at <the following date>< the following time>.
And upon receiving this message, automatically your e-aadhaar will start downloading or it will ask you to save it with whatever name.
View it here…
Congratulations your e-Aadhaar has been downloaded!
Remark: Now you have your e-Aadhaar in the PDF format but do you know it is password protected.
Don’t panic with the password, the secret of this password is discussed in the section of print aadhar.
Last but not least, it was awesome to deal with this formula of downloading aadhaar card by enrolment ID (EID) but what if one fails to the conditions of this guide also.
Not a big deal, just keep scrolling till the end. I deal, any of the formulae is definitely going to match your terms.
This time, have a look at the guide on how to download aadhaar card by virtual ID (VID).
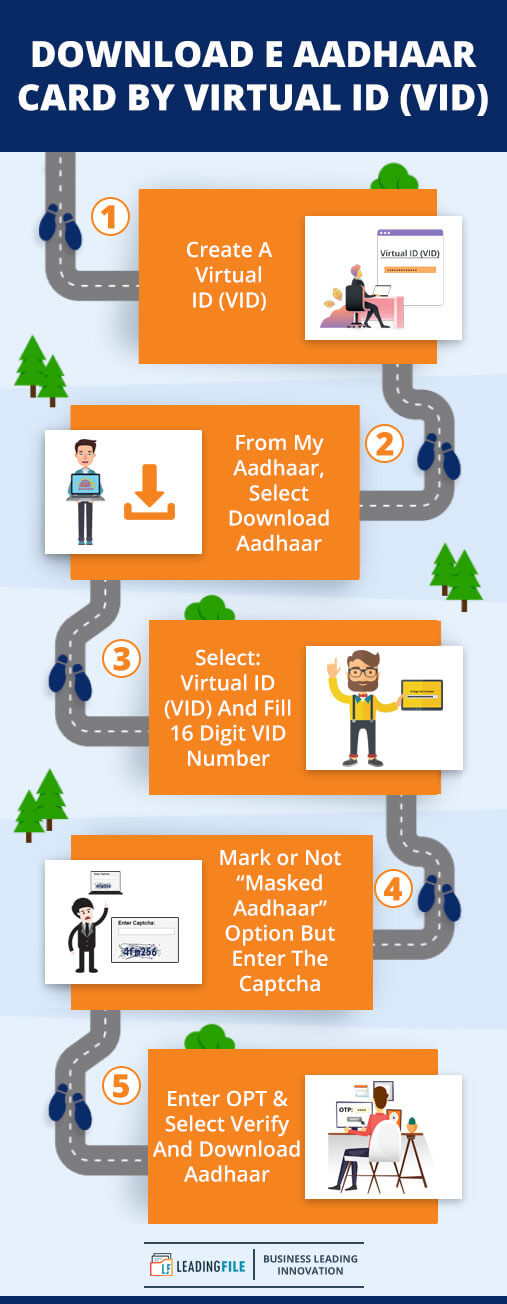
e Aadhaar Card Download: Steps To Download Aadhar Card By Virtual ID (VID)
Another shining method towards the e-Aadhaar card download is here…
Let’s join it (Download Aadhar Card By Virtual ID) together.
Literally, if you have your aadhaar virtual ID (VID) then also you can download your e-aadhar.
Well, it is the latest addition on the UIDAI’s portal for downloading the aadhaar by UIDAI (Unique Identification Authority of India) itself.
Remember: To be able to go with the process of downloading aadhar card via virtual ID, you must have the virtual ID and if you don’t have that then you can also create it.
Needless to mention that virtual ID (VID) is supposed to be on your masked aadhaar slip. If you don’t have that also then don’t panic, create it with us here only/-
Going forth, steps to execute e aadhaar card download by virtual number is as follows:
- Create A Virtual ID (VID)
- From My Aadhaar, Select Download Aadhaar
- Select: Virtual ID (VID) And Fill 16 Digit VID Number
- Mark or Not “Masked Aadhaar” Option But Enter The Captcha
- Enter OPT & Select Verify And Download Aadhaar
Now, let’s discuss these points along with the images, inforgraphics and GIF representation in detail, as…
![]()
Create A Virtual ID (VID)
VID is nothing but a temporary 16 digit random number mapped with your aadhaar number.
Though, this number can be used as an alternative to your aadhaar number whenever authentication or e-KYC services are performed.
Isn’t it a cool number.
Let’s learn how to create a virtual number or so-called Virtual ID (VID).
Certainly, VID (Virtual ID) can be created in numerous ways but all can’t be that much easy for you.
Among all, we have come out with the easiest two methods. Have a look…
- Create A Virtual ID By SMS
Yes, VID can be generated by sending an SMS to the aadhaar helpline number 1947.
The SMS should be containing (typed) “GVIDLast 4 digits of your aadhaar number” (LIKE – GVID1234). Upon typing this all, send it to 1947 through the registered mobile number.
- Create A Virtual ID By Visiting The Official Website Of UIDAI
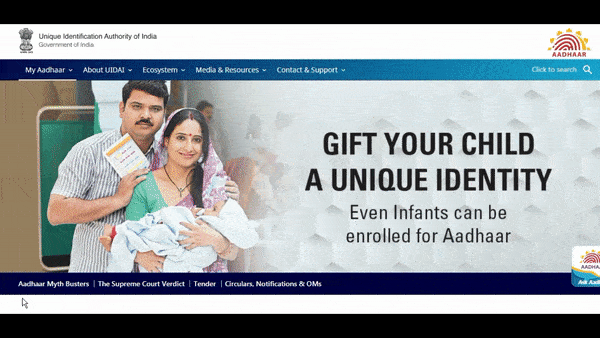
In order to visit the official website, click on the text here; UIDAI.
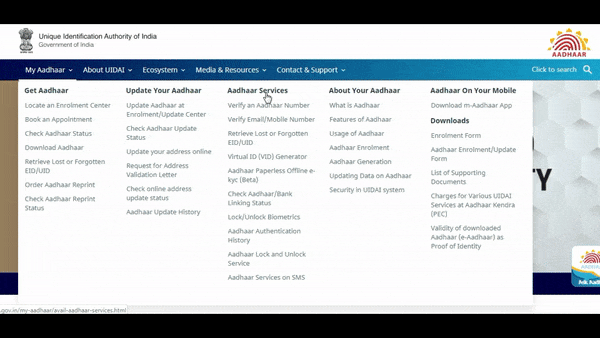
Once you click over the text, you will face the “Unique Identification Authority of India” official website. To which you need to find the “My Aadhaar” option.
The time you find it, remember that you need not to click over it, just take your cursor over it and the time you will do so, it will open a drop-down menu’s list, illustrating the following options.
- Get Aadhaar
- Update Your Aadhaar
- Aadhaar Services ->
- About Your Aadhaar
- Aadhaar On You Mobile
- Downloads
Among all these options, go along with the list of “Aadhaar Services”. To which you will find “Virtual ID (VID) Generator”.
Facing difficulty while finding the option, have a look…
An GIF illustrating the drop-down menu list and the selected option is as follows:
Time and again, when you will find it (Virtual ID (VID) Generator), click it.
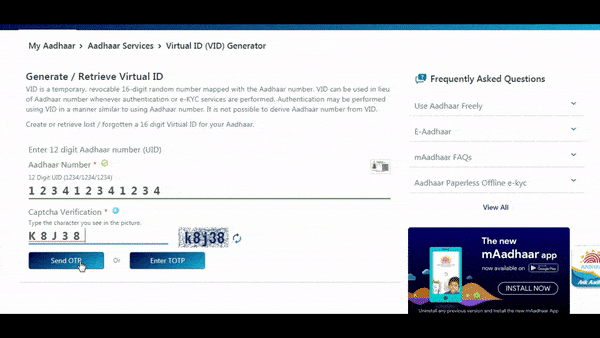
Once you click over it, you will be redirected to another window, asking you to provide the “Aadhaar Number” and type the “Captcha”.
File the same and check whether they are correct or not. Later, hit over the “Send OTP” button.
An GIF illustrating the same is as follows…
Upon hitting the “Send OTP” button, you will be sent a 6 digit OPT (One-Time Temporary Password) on the registered mobile number with a validity of 10 minutes.
Also, the page you were filing the information will be refreshed and will get enlarged. Now, it will be asking you to enter the OPT and choose either option – “Generate VID” or “Retrieve VID”.
However, by default, it will be “Retrieve VID”, change it to the “Generate VID”. upon doing this, hit the “Generate” button.
A GIF illustrating the same is as follows:
Congratulations your virtual ID (VID) has been generated and sent to your registered mobile number.
![]()
From My Aadhaar, Select Download Aadhaar
Time and again, scroll over the “My Aadhaar” menu button and remember that only to scroll and not to click. Doing so will again open a drop-down menu but this time look for the “Download Aadhar” instead of “Virtual ID (VID) Generator”.
The time you find it, click over it. Doing so will redirect you to a new tab with a new screen with several options to download your e-aadhar card.
View it here…
The options are as follows:
- Aadhaar Number
- Enrolment ID (EID)
- Virtual ID (VID) ->
And this time you need to go with the last one i.e — “Virtual ID (VID)”.
![]()
Select: Virtual ID (VID) And Fill 16 Digit VID Number
As soon as you select the “Download Aadhaar” option, you will face a page with three radion buttons on it. Somewhat – Aadhaar number, Enrolment ID (EID) and Virtual ID (VID), as asked – select the last one i.e Virtual ID (VID).
Upon selecting the same, you will be asked to fill the 16 digit VID number that is sent to your registered mobile number.
After all, fill the same and verify all the information that you have filled is correct.
It seems to be complicated, right? Ok, let me make it easy for you: have a look at the GIF representation…
![]()
Mark or Not “Masked Aadhaar” Option But Enter The Captcha
As other alternatives, on the way to download aadhaar card by virtual ID (VID) or so-called virtual number, the next step is to mark an option, named – “I want a masked aadhaar”.
Well, it completely depends on you to either mark it or not but if mark this option then you can download your aadhaar card with only the last four digits being visible and rest the cross marked.
Somewhat it automatically enables the security of your aadhaar.
All right. But what if one didn’t mark it or select it? Nothing big!
If you don’t mark this option then you will be provided with a regular aadhaar card PDF (password protected) with all 12 digits and details being visible.
So no matter whether you mark it or not but over the next phase, you need to enter the captcha.
Captcha is provided just aside of the blank space to fill with.
Finally, after dealing with all these kinds of stuff, run for the “Send OTP” option. Well, to this point you have two options to select but I will recommend you opting the first one i.e “Send OTP”.
An address to this recommendation is – OPT comes with a six-digit code along with a validity of 10 minutes. On the other hand, the TOTP comes with an eight-digit code along with a validity of 30 seconds only/-
Isn’t it too much work? It is. So, in order to avoid this much work, just select the “Send OTP” option.
Finally, in order to view the complete process of doing the same, visit the GIF attached-above with the step 3rd.
![]()
Enter OPT & Select Verify And Download Aadhaar
Check out your registered mobile number, it might be popping-up with the Aadhaar SMS.
Similar to this — OTP for Aadhaar (xx6750) is 178968 (valid for 10 mins). You can view your Aadhaar Authentication history. For more details visit uidai.gov.in
Found it? If yes, then enter the same OTP and scroll down.
In the way of scrolling, you will be asked to take a quick survey. Though the survey part is mandatory and till the UIDAI creates your e-Aadhaar, they request you to take this survey so that they can improve their services.
Don’t worry, they assure you that they will keep all your information confidential.
Mark: To know the answer to the survey part questions, put in your eyes on the last section of aadhaar card download by aadhaar number only or aadhaar card download by enrolment number guide.
Upon getting done with the survey part, scroll down. Time and again, in the way of scrolling you will find the “Verify And Download Aadhaar” option.
Anyways, click over it. The time you click over it, automatically a PDF will start downloading or it will ask you to save it with whatever name.
View it here…
That’s not only the PDF but that’s also your e-aadhaar. Password protected e-aadhaar.
Remark: Now you have your e-Aadhaar in the PDF format but do you know it is password protected.
Don’t panic with the password, the secret of this password is discussed in the last section of the very blog post within the print aadhar heading.
Hurray, we are done with the downloading process of aadhaar card by using the virtual ID (VID). But, as each coin has two sides – what if one fails to the conditions of this guide requirements?
Don’t panic, just keep going till the end of the post. I deal, your race of aadhaar card download is definitely going to end here.
This time have a look at the guide on how to download aadhar card by name and date of birth.
Aadhaar Card Download By Name And Date Of Birth: September Updated
Lost your aadhaar and even the recovery details like – UID, EID & VID. Don’t worry, aadhar card download by name and date of birth is alive. Hear LIVE from it…
Certainly one might lose his/her Aadhaar Number (UID) and Enrolment ID (EID). This didn’t mean that they further can’t download their aadhaar. They can. How? Keep going…
DO YOU KNOW: Recently UIDAI has changed the way of aadhar card download with name and date of birth.
Not only that but the authority also has changed all other methods of downloading the aadhaar, even few were removed.
Don’t worry we have mentioned the latest guide and also we keep our guide updating on a regular basis.
Let’s start with a query format;
What if — you lose your aadhaar card and also the enrolment ID (EID), aadhaar number (UID) and the virtual ID (VID) too.
I think, to date, in order to deal with any of the aadhaar issues, you were supposed to visit the nearby aadhaar center and sometimes the UIDAI office itself. But today you need not to go anywhere, just a single visit to the UIDAI official website from your home can do all the work for you.
Isn’t it cool? Have a look…
e Aadhaar Card Download By Name And Date Of Birth: Step-By-Step
A method which overcome the various aadhaar lost conditions.
Yes, if you do not remember your aadhaar number, enrolment ID and even the virtual ID then you can follow the path of aadhar card download by name and dob. For sure, it will rock…
Remember: To be able to go with the process of e aadhar card download by name and date of birth, you must have your mobile number or email address registered with the UIDAI.
Process of downloading the aadhar card via name and date of birth is as follows:
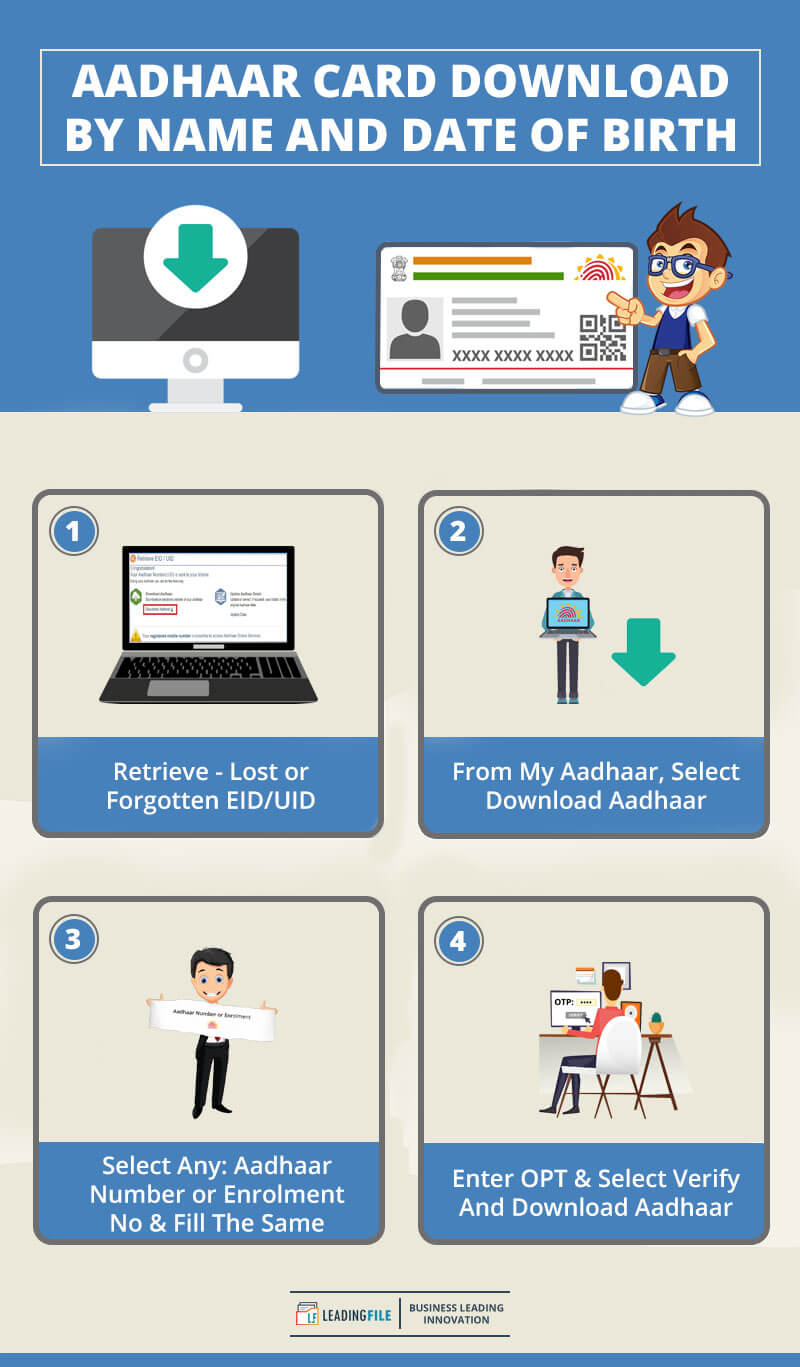
- Retrieve – Lost or Forgotten EID/UID
- From My Aadhaar, Select Download Aadhaar
- Select Any: Aadhaar Number or Enrolment No & Fill The Same
- Enter OPT & Select Verify And Download Aadhaar
Now, let’s discuss these points in detail along with the aadhar card download by name and date of birth youtube like GIFs and infographics in detail…
![]()
Retrieve – Lost or Forgotten EID/UID
In order to retrieve the lost or forgotten EID/UID [Enrolment ID/Unique ID (Aadhaar Number)], you need to visit the UIDAI official website. For the sake of the same, click here: UIDAI.
Once you click over it, a screen will appear in front of you – somewhat like this…
To this screen, look for the “My Aadhaar” menu button, located on the top menu bar.
The time you find it, scroll to it. Remember, you do not need to click over it, just scroll to it. Doing this pop-up a drop-down menu list to you, containing the following options:
- Get Aadhaar
- Update Your Aadhaar
- Aadhaar Services ->
- About Your Aadhaar
- Aadhaar On You Mobile
- Downloads
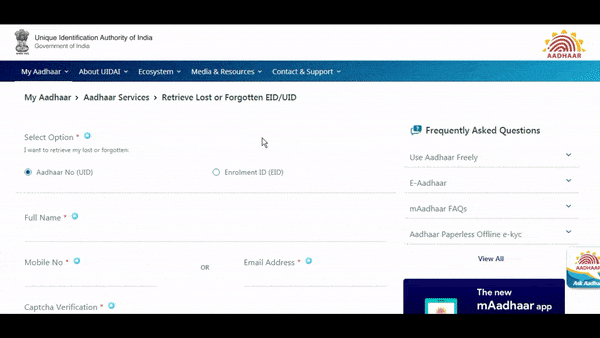
Among all, go along with the 3rd one i.e — “Aadhaar Services” or with the 1st one i.e, — “Get Aadhaar”. Time and again, remember, you don’t need to click over it also, just go through the points mentioned below the same services. To these points, look for “Retrieve – Lost or Forgotten EID/UID”.
This time – once you find it, click it.
Doing so will redirect you to another tab, have a look at the new tab…

Yes, to such a screen you will be redirected upon clicking the “Retrieve – Lost or Forgotten EID/UID” option.
As seems this screen will firstly ask you to select either option – “Aadhaar No (UID)” or “Enrolment ID (EID)”. Later to selecting the option, it will ask you to provide the details registered with the UIDAI like – “Full Name”, “Mobile No” or “Email Address”.
Mark: In order to view the “Virtual ID” generation process please do visit the — e-Aadhaar Card Download: Steps To Download Aadhar Card By Virtual ID (VID).
Upon this, it will ask you to enter the captcha which is provided just aside of the blank space to fill with.
Done? Yes, it was quite easy.
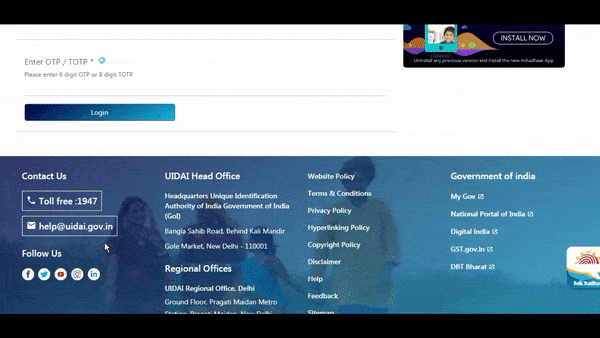
All right, just hit the “Send OTP”. Upon hitting the same, you will face a screen with a green pop-up message displaying — “OTP sent to your Registered Mobile number, Check your mobile”.
Check out the whole process…
Hurry up, take out your cell phone and open the latest message from Aadhaar containing the 6 digit code with a validity of 10 minutes.
Till scroll-down the screen, you were working upon. What did you see? Didn’t it seems to be asking you to provide the sent OTP.
By looking at this screen some will say – what’s the difference? To those who didn’t find any difference please view it again by my eyes.
Didn’t you see the “Enter OPT/TOTP” option? It is right there below the “Mobile No” filing option encircled with a red rectangle.
Long story short, enter the OTP you just received and hit the login button.
Upon hitting the “Login” button again you will be redirected to another tab with a new screen illustrating — “Your UID is sent to your registered mobile no”.
Have a look…
However, this message will be displayed when you select the “Aadhaar No (UID)” option. Subsequently, if you would have selected the “Enrolment ID (EID)” option then you might have faced a green pop-up displaying — “Your EID is sent to your registered mobile no”.
What next? Next, is to follow-out the complete — aadhar card download by aadhaar number only or aadhaar card download by enrolment number process.
Needless to mention that it depends on your selection of retrieving method. Now, let’s jump over to the next phase…
![]()
From My Aadhaar, Select Download Aadhaar
Well, the on-going process is completely similar to that of the above-mentioned processes of downloading the aadhar by aadhaar number, enrolment number, and the virtual ID.
But, to my deal, I will elaborate on this method completely. Keep going…
As of heading demands to select the “Download Aadhaar” option from the “My Aadhaar”. So, at first, we need to locate the “My Aadhaar” button. It is right there on the top of the menu bar.
Found it? If not then visit it here via the GIF, illustrated as follows…
Going forth, as demonstrated in the GIF, click over the “Download Aadhaar” option.
As soon as you click over it, you will face a new tab with a new screen with several options to download the e-aadhaar card.
Also, you can visit this screen directly by clicking the link mentioned as… faadhaar.
Options will be similar to the radio button, as…
- Aadhaar Number ->
- Enrolment ID (EID) ->
- Virtual ID (VID) ->
Go with either option!
![]()
Select Any: Aadhaar Number or Enrolment No & Fill The Same
Under this alternative, you need to select the same methods which you have selected while retrieving the UID/EID.
If you have selected the UID option then select the “Aadhaar Number” radio button and fill the 12-digit UID (like – 1234/1234/1234).
Upon filing the UID (Aadhaar number), mark or not the “Masked Aadhaar” option and later to that enter the captcha.
At last, hit the “Send OTP” option.
Found it complicated? Don’t panic, understand it thoroughly via the GIF, here…
On the other hand, if you have selected the EID option then select the “Enrolment ID (EID)” radio button and fill the 14 digit-ENO along with a 14 digit date-time stamp printed on the enrolment slip.
Upon doing so, mark or not the “Masked Aadhaar” option but enter the captcha. Finally, after filing the captcha, press the “Send OTP” option.
Understand the entire process here…
![]()
Enter OPT & Select Verify And Download Aadhaar
Once you have received the OTP (One-Time Temporary Password), enter the same and start looking for the “Verify And Download Aadhaar”.
In the way of looking the same, you will be asked to take a quick survey. Though the survey part is mandatory so get done with it and later start looking for the same.
Don’t worry you will find it just next to the survey part.
Found it? If not then have a look at the GIF, illustrating the same…
Remark: Now you have your e-Aadhaar in the PDF format but do you know it is password protected.
Don’t panic with the password, the secret of this password is discussed in the last section of the very blog post within the print aadhar heading.
Finally, it was awesome to deal with this formula of downloading aadhaar card by name and DOB.
What next? Next, let’s discuss another method to download the aadhaar card i.e – aadhar card download with mobile number.
How To Download Aadhaar Card With Mobile Number: Online Format
These days, in order to enjoy certain government welfare facilities – one is required to have the “Aadhaar”.
Well said — aadhaar is somewhat: “Mera Aadhaar, Meri Pehchaan”.
Not only that but this document also acts as a proof of address and identity as well for an individual.
Needless to mention that it is a mandatory document and everyone is supposed to have it.
Going forth, when an individual enrolls for the aadhaar then he himself can download and print it by using the mobile number and even without mobile number.
Also, he can download it by using the enrolment number, virtual ID, aadhaar number, mobile applications, and the name + DOB or email address. Just depending on the condition to which it falls and upon the ID s/he haves.
This time, we are here with a quick overview guide on — aadhar card download with mobile number.
Let’s hear the rumble…
Remember: To be able to go with the process of aadhaar card download online by name and mobile number, you must have your mobile number or email address registered with the UIDAI at the time of enrolment and also any of the ID with you.
ID’s be like – Enrolment ID (EID) or Virtual ID (VID) or Aadhaar Number (UID).
All right! But what if one doesn’t have any of the ID. Not a big deal, you can create (generate) one.
Before jumping into the ID’s creating field, let’s know a well-known fact…
Fact — If you don’t have the UID (Aadhaar Number) then you can’t create the VID (Virtual ID). Somewhat VID is completely dependent on UID.
Hence, if you don’t have the VID then immediately start creating or generating the UID (Unique ID/Aadhaar Number) or EID (Enrolment ID).
The formula to create (generate) UID/EID is just a step away, here – Aadhaar Card Download By Name And Date Of Birth… You will find it by making a few scrolls down by reaching this guide.
But if you have the VID and not the EID/UID then instantly you can start downloading your aadhaar by visiting this section — Aadhaar Card Download BY Virtual ID (VID).
Also, if you have EID or UID and not the VID then also you can start downloading your aadhaar card by simply visiting either section…
- — Aadhaar Card Download By Enrolment Number (EID) or
- — Aadhaar Card Download By Aadhaar Number Only (UID).
Time and again, the steps to execute aadhaar card download by mobile number and name is as follows:
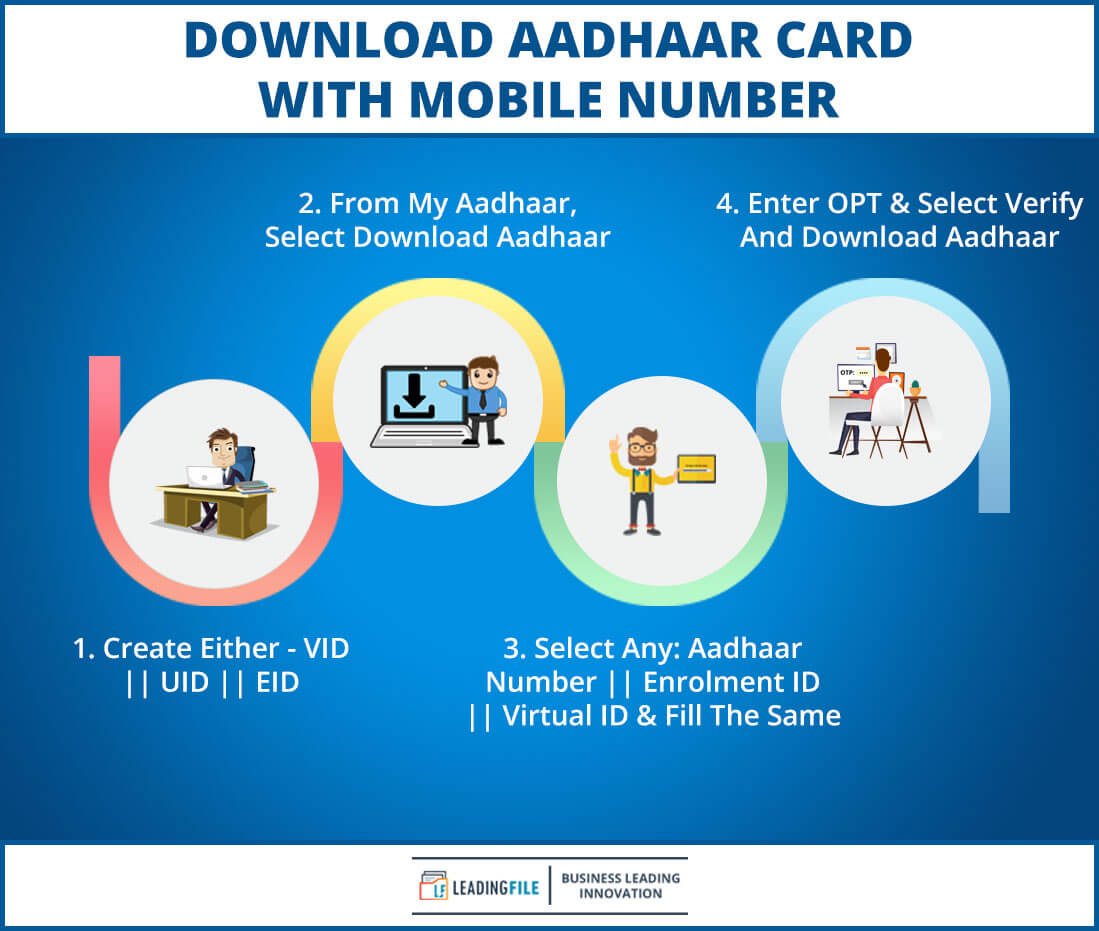
- Create Either – VID || UID || EID
- From My Aadhaar, Select Download Aadhaar
- Select Any: Aadhaar Number || Enrolment ID || Virtual ID & Fill The Same
- Enter OPT & Select Verify And Download Aadhaar
Congratulations your aadhaar has been downloaded.
Now, let’s jump over the next method, as — Aadhar Card Download Without Mobile Number.
How To Download Aadhaar Card Without Mobile Number: Sustaining Method
Note: This method is out of order and if you really wish to download your aadhaar card then register your mobile number today by visiting the nearest PAC (Permanent Aadhaar Centre).
People these days are fond of searching for a way to overcome the aadhar card download without mobile number.
In the way of searching, they even look for — how to download aadhar card online without OTP.
And the only reason behind this is that they haven’t yet registered their mobile number with UIDAI.
Remember: To be able to go with the process of aadhaar card download without mobile number, you must have the enrolment ID.
Don’t panic, now you can also download your aadhaar card without OTP or call it without registering your mobile number under the UIDAI.
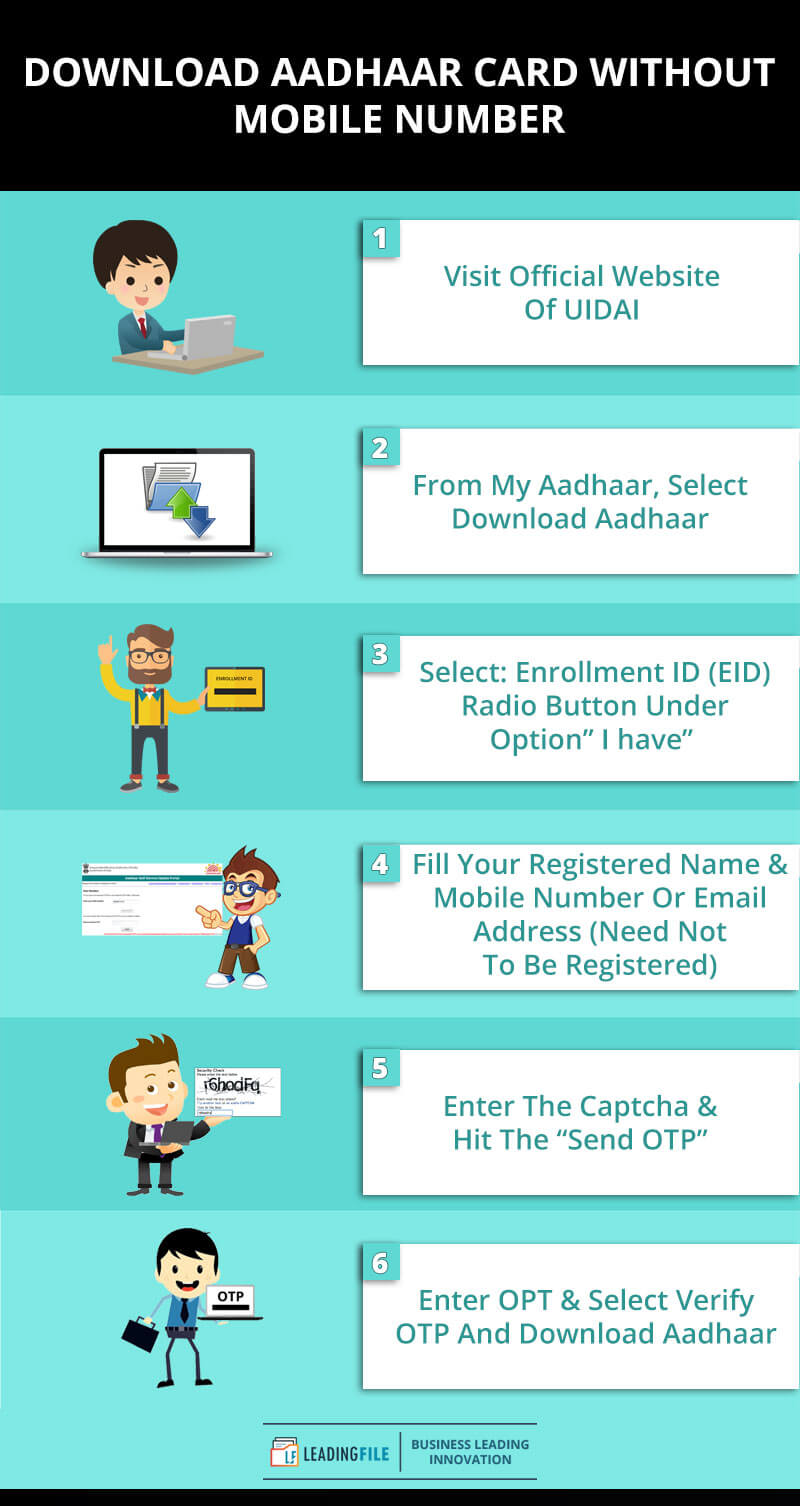
Steps to execute the aadhaar card download without mobile number or OTP is as follows:
- Visit Official Website Of UIDAI
- From My Aadhaar, Select Download Aadhaar
- Select: Enrollment ID (EID) Radio Button Under Option “I have”
- Fill Your Registered Name & Mobile Number Or Email Address (Need Not To Be Registered)
- Enter The Captcha & Hit The “Send OTP”
- Enter OPT & Select Verify OTP And Download Aadhaar
Going forth, if you have your enrolment ID, similar to the above illustrated one then follow out the same section by clicking here – Aadhaar Card Download By Enrolment ID.
Well, you are supposed to fill all the details correctly and even supposed to visit a nearby Permanent Aadhaar Centre (PAC).
Not only that but you are also supposed to carry all necessary documents pertaining to your identity. As soon as you approach the nearby center, an executive will do a biometric test of you and will update all your information to the UIDAI official portal.
Last but not least, if you fail to overcome with this method too then the last and optimal one is here – aadhaar card download by mAadhaar App.
Download Your Aadhaar Card By mAadhaar App: UIDAI Latest Update
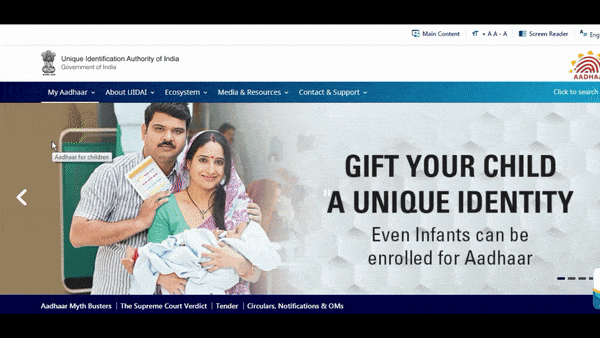
This time gift your child a unique identity (UI).
Not only adults but infants can also be enrolled for aadhaar. Enroll for it today…!!!
After all, aadhaar is not a fun card it is somewhat — “My Aadhaar, My Pride”.
Mark: Update your child’s biometrics at the age of 5 and 15.
Also, these biometric updates are FREE and can be done only at a Permanent Aadhaar Kendra.
So, get it today. Whereas, if you have enrolled for it then download it via any of the method mentioned-above or by mAadhaar App here…
Here’s how you can download your aadhar card by m-Aadhaar App: UIDAI latest update…
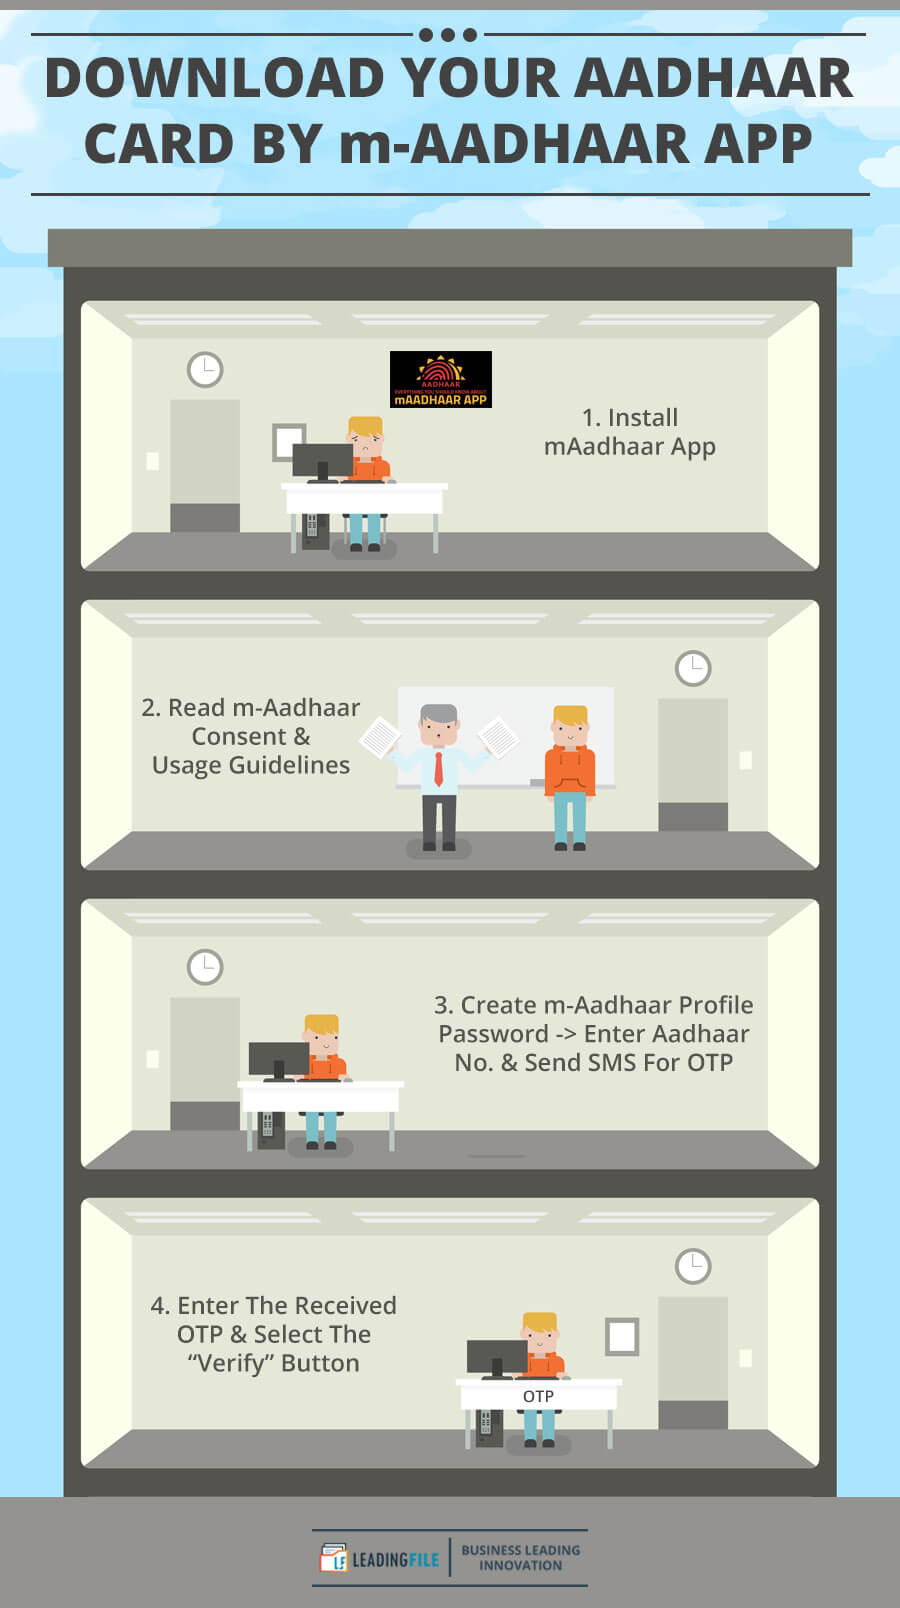
- Install mAadhaar App
- Read m-Aadhaar Consent & Usage Guidelines
- Create m-Aadhaar Profile Password -> Enter Aadhaar No. & Send SMS For OTP
- Enter The Received OTP & Select The “Verify” Button
Now, let’s discuss these points along with the images in detail and also have a look at the infographics of the same;
Remember: To be able to go with the process of e-aadhar card download by using m-Aadhaar app, you must have your aadhaar number with you and also your mobile number registered with the UIDAI.
![]()
Install mAadhaar App
The very first step asks you to install the mAadhaar app and in order to do so, you have been provided with two methods.
- — Install Directly From Your Mobile
To this method, you can install the mAadhaar app directly from the Google Play Store App just by typing – mAadhaar.
To my surprise, few of you might have even installed that before letting you know the further on-going process. But, for those who seem to be unaware of this process, join the guide…
At first, type mAadhaar in search of the Google Play Store App.
Upon typing this, you will see a screen with the aadhaar logo asking you to click over the “Install” button, which is located next to the logo itself.
Don’t hesitate, click over it. The time you will click over it, automatically an installation process will start. Upon getting installed, the same “Install” button will get changed into the “Open” button.
All set, now you are ready to use the mAadhaar app.
- — Install From UIDAI Website
To this method, you can install the mAadhaar app from the UIDAI website.
For the sake of the same, at first, you need to visit the official website of UIDAI. Once you reach the website, you will face a screen something similar to this…
By reaching this screen, start looking for the “My Aadhaar” menu button, located at the first position of the top menu bar.
Once you find the same, scroll to it. Also, remember that you need to click it, just take your cursor to it and by doing so, it will open a drop-down menu list. Time and again, start looking for the “Aadhaar On Your Mobile” option. Once you find it, scroll to it and crawl a bit downwards. There you will find the “Download m-Aadhaar App”, click it.
Upon clicking, you will be redirected to another tab something similar to this one…
As seems that it is a 3+ rated app with over 79,625 users and is also compatible with your device. So, without any hassle, click over the “Install” button.
Once you click over the “Install” button, it will ask you to “Choose a device” which is logged in with the same email ID you are browsing with.
Again, upon choosing the device, click over the “Install” button.
Later to clicking the same button, within a reflection of the second, the installation will start on your cell phone (mobile). Also, a shortcut will get created on the home screen of your mobile.
What next? Next is to go along with the app. Keep going…
![]()
Read m-Aadhaar Consent & Usage Guidelines
As soon as you are done with the installation process, click over the “Open” button or simply visit the app. Once you hit the “Open” button, you will face a mAadhaar consent. Consent be containing all the features provided by the mAadhaar app.
Go thoroughly to each and select the “OK” button.
Once you select the same button, you will be shown the “Usage Guidelines”. Have a look…
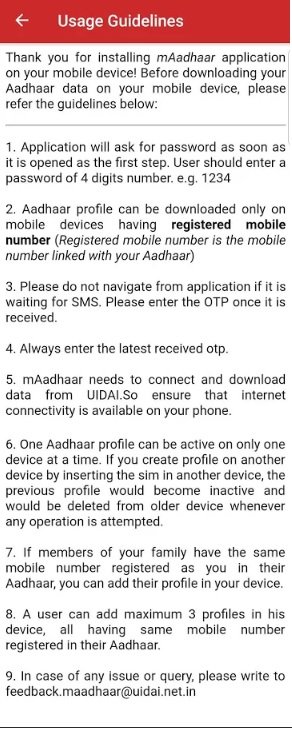
Time and again, read these guidelines carefully and follow (click) the reverse arrow icon located on the top of the left corner. The very reverse action will take you to the “Create Password” option, as follows…
![]()
Create m-Aadhaar Profile Password -> Enter Aadhaar No. & Send SMS For OTP
As of now, you are viewing a screen asking you to create a password for your m-Aadhaar profile.

Create and confirm the same. Remember that you are allowed to create a password of not more than four (4) digits. For instance – 1234.
Upon this, click over the “Confirm” button. This will take a second to create your password on the mAadhaar app.
Done! Congratulations your password has been created. Later to this, again, you will be facing a new screen asking you to provide the “Aadhaar No”.
Have a look…
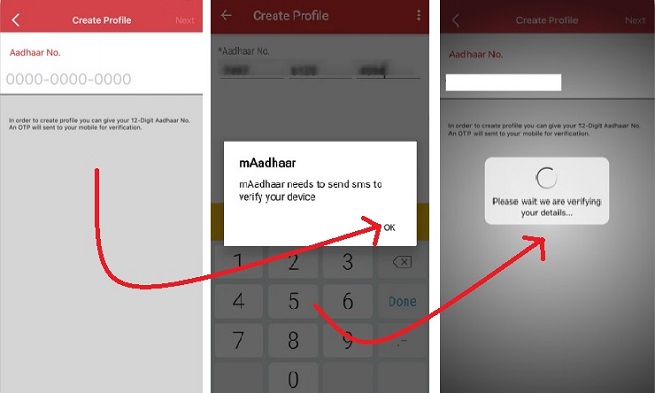
Enter the same and click over the “Next” button. Once you click over the same, browsing will start for a second and later to browsing it will ask you — “mAadhaar needs to send sms to verify your device”. To this, click over the “OK” button.
This “OK” button selection will take you to the “Message App” and will ask you to send a default message. Send the same and wait for a second.
Time and again, browsing will start asking you to wait for 30 seconds and later to that you will be sent an OTP on your registered mobile number.
![]()
Enter The Received OTP & Select The “Verify” Button
Yes, in order to complete the create profile process, please enter the OTP that you received on your registered mobile number and later to that click over the “Verify” button.
Have a look…
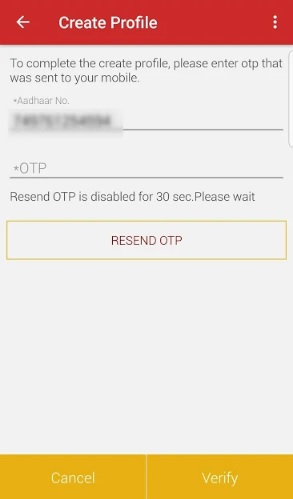
Once you click over the “Verify” button, again, you will be facing a new screen asking you to provide the “Password”, which was created a few minutes before while creating the profile.
Consequently, enter the same password and click over the “OK” button.
Upon hitting the same, you will be viewing your name and aadhaar number along with a lock icon on your mobile screen.
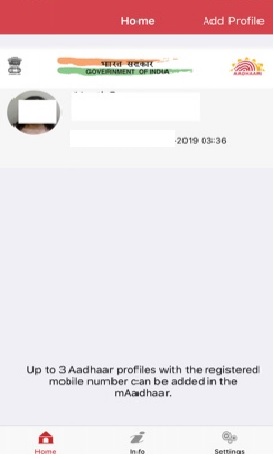
Mark: If members of your family have the same mobile number registered as you in their aadhaar then you can add their profile (a maximum of 3 profiles) to your device.
Looking at this, a few users commented and asked how to access the aadhaar details.
Don’t worry it is protected with the same password which you have created a few minutes before. On-going to have access to your details, just for once click your aadhaar which you are viewing on your mobile screen.
The time you click over it, it will again ask you to enter the same password.
Needless to mention that enter the password which you have created at the first stage of your m-aadhaar profile creation.
Upon entering the same password, you will be facing a screen something similar to this one…
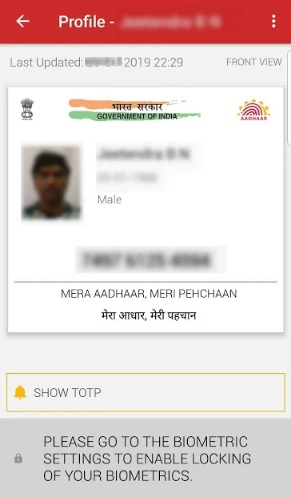
Going forth, you can also enable the locking of your biometrics by visiting the biometric settings.
Mark: Enabling this setting will provide you the facility of auto-locking of your aadhaar details within 10 minutes.
For the sake of the same, click over the three (3) dots located on the top of the right side of your mobile screen. The time you click over it, the same time a drop-down list will appear to you, containing the following options…
- Biometric Settings ->
- Notification Report
- VID Generation
- Delete Profile
- View Updated Profile
- Show QR-Code
- Share e-KYC
Among all, select the first one i.e – “Biometric Settings”. Upon selecting the same, you will be redirected to another screen, similar to this…
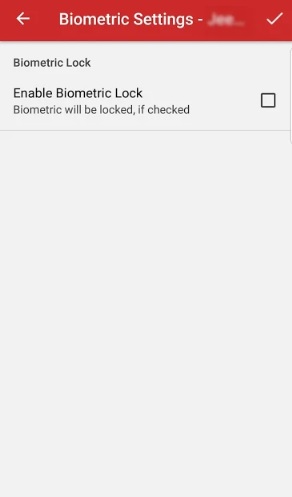
To this, you need to enable the biometric lock by selecting the box, located just next to the biometric lock info.
All set, now you are ready to go with the biometric lock.
So, feel free to use and forgive to lock back your aadhaar details.
All done! Congratulations your Aadhaar card has been downloaded on your mobile…!!!
Aadhaar Card Download: Graphical Vision

In order to go with academic discipline, visit — Theoretical Aadhaar Card Download Guide…!!!