
How To E-Verify ITR Through
E-Verify ITR: Learn 6 Online Methods Of ITR E-Verification
- July 29, 2019
- Posted by: Editorial Team
- Category: Income Tax
Overview
Till date, time is the major concern in all!
Further to which, the government is trying harder to go green and make e-filing process completely paperless. But the necessity of sending signed ITR-V form physically to Bangalore was becoming an obstacle.
Hence, to make the dreams come true, the government has come out with a process named E-Verify ITR. Where the verification of ITR is done via EVC (Electronic Verification Code).
Let’s fragment “E-Verify ITR” and discuss it in detail.
Literally, by formulating the same, we came across some of the most searched questionnaires which are as;
| [simple_tooltip content=’E-Verification of ITR somehow means electronic verification of the ITR, where the taxpayer verify his/her tax returns via generating EVC (Electronic Verification Code).
Subsequently, and from the known fact – every online…Keep Going.’]What is e-verification?[/simple_tooltip] |
[simple_tooltip content=’EVC stands for the “Electronic Verification Code”!
Fast forward, it is an electronically generated 10 digits alphanumeric code, which is used to verify tax return. For instance: xxxxxxx235…Keep Going.’]What is EVC?[/simple_tooltip] |
[simple_tooltip content=’In order to e-verify your ITR through net banking or any other method, please make sure that you have access to the net banking or that particular method…Keep Going.’]How to e-verify ITR, and much more?[/simple_tooltip] |
Certainly, it is no secret that e-verifying ITR (Income Tax Return) is not a doodle!
Further to which, peoples are confused of selecting the way to e-verify ITR. Often they hesitate with the EVC generation and even they are confused about the phrase — EVC accepted means.
Admirably, EVC accepted means that your EVC which commonly stands for ‘Electronic Verification Code’ is valid and has been accepted. Wherefore, now, you are capable of downloading your ITR-V.
Looking at this – we brought a complete encapsulated guide for you over same. Keep going…
E-Verify ITR | What E-Verification Of ITR Means
E-Verify ITR; in complete stands for e-verification of ITR (Income Tax Return)!
But, what e-verification of ITR means? E-Verification of ITR somehow means electronic verification of the ITR, where the taxpayer verify his/her tax returns via generating EVC (Electronic Verification Code).
And from the known fact – every online verification process needs to generate an EVC (Electronic Verification Code).
However, if you don’t wish to e-verify your ITR, online. Then you need to go along with the offline process, to which follow: ITR-Verification Process.
Getting back to the stuff; how to e-verify your Income Tax Return (ITR)?
Not a doodle!
Even, understanding the term ITR-V (Income Tax Return-Verification) is not a bit easy. Going throughout this, one must be glancing for – What it meant, to be done with the e-verification of ITR?
Obvious – the successful e-filing of your Income Tax Return! For the sake of same, follow out the steps shown below -:-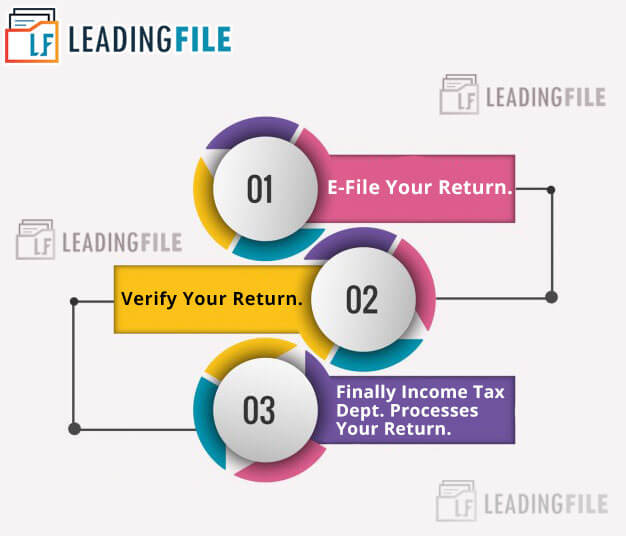
This was all, about the successful e-filing of ITR.
Now, concerning the step 02: in detail i.e verify your returns.
Basically, it involves two methods one is offline and the other one is online. We recommend you opting the online, done throughout the netbanking.
Note: The reason behind our recommendation is -:-
After successfully e-verifying your ITR via net banking, you don’t have to send your ITR-V form physically. Despite, if you don’t wish to e-verify your ITR, then, you will have to send the physical ITR-V.
But, the question is who is eligible and who can go with which method of e-verification.
So, let’s crack the mystery…
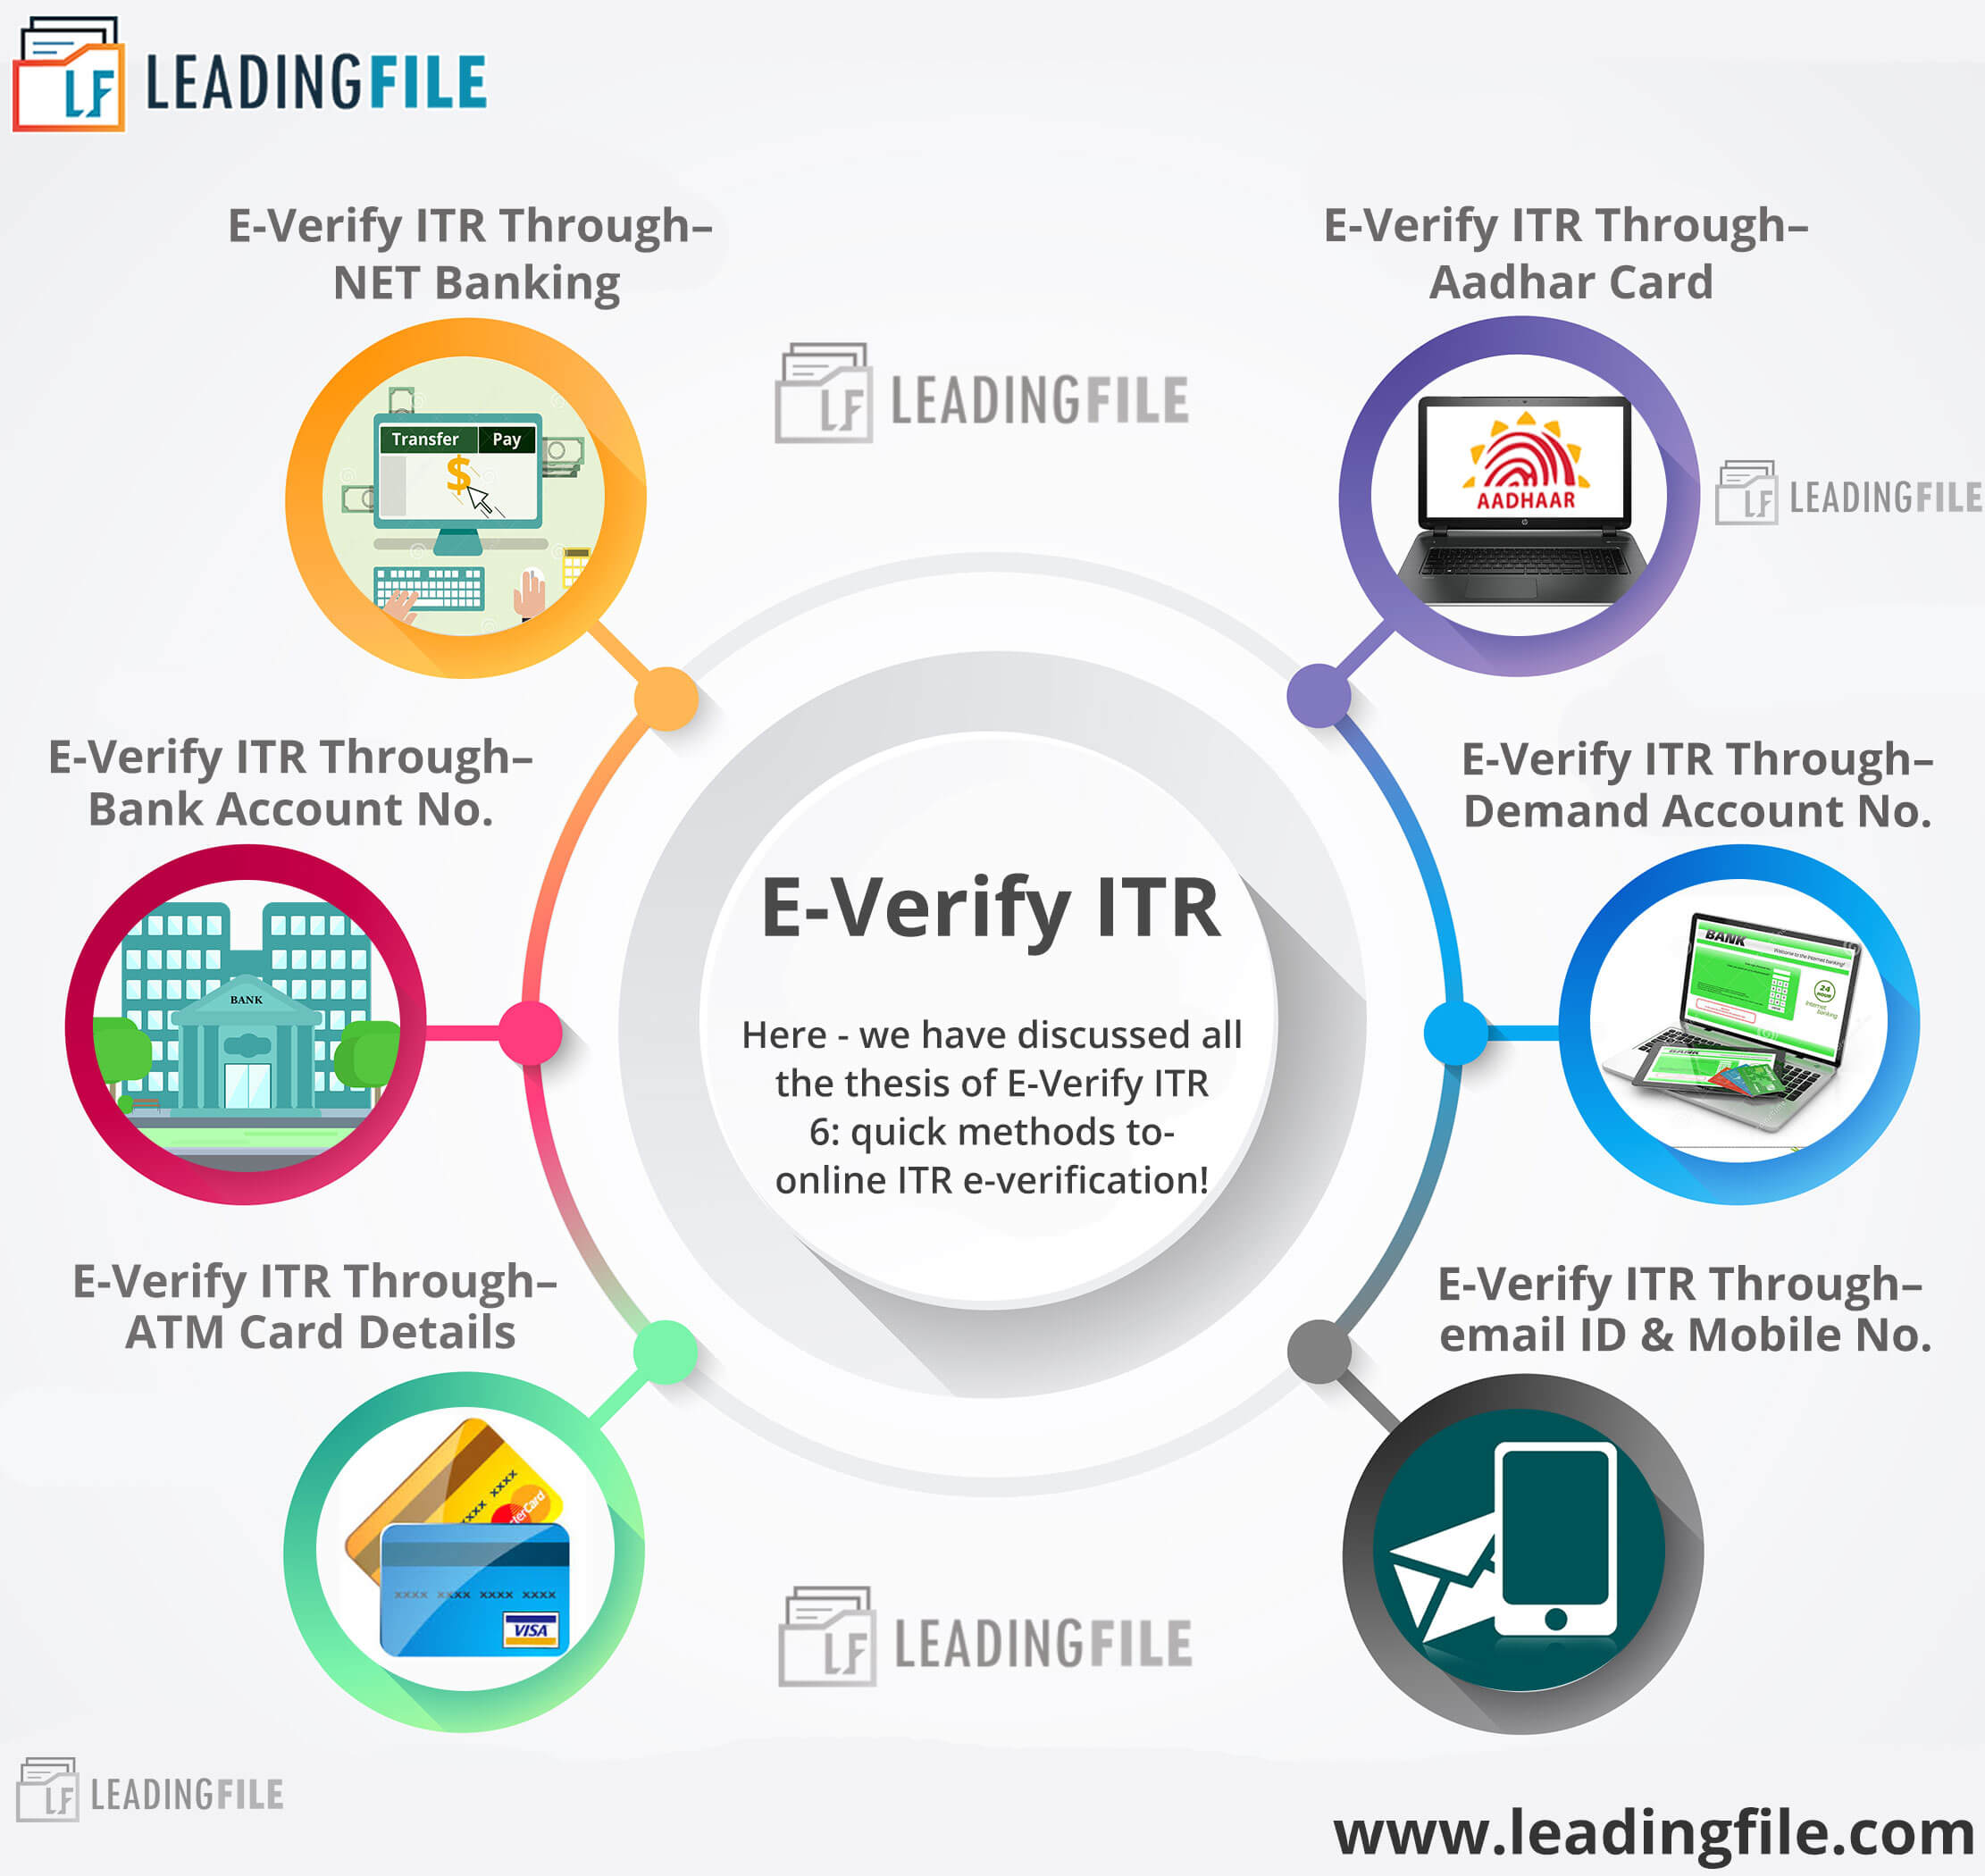
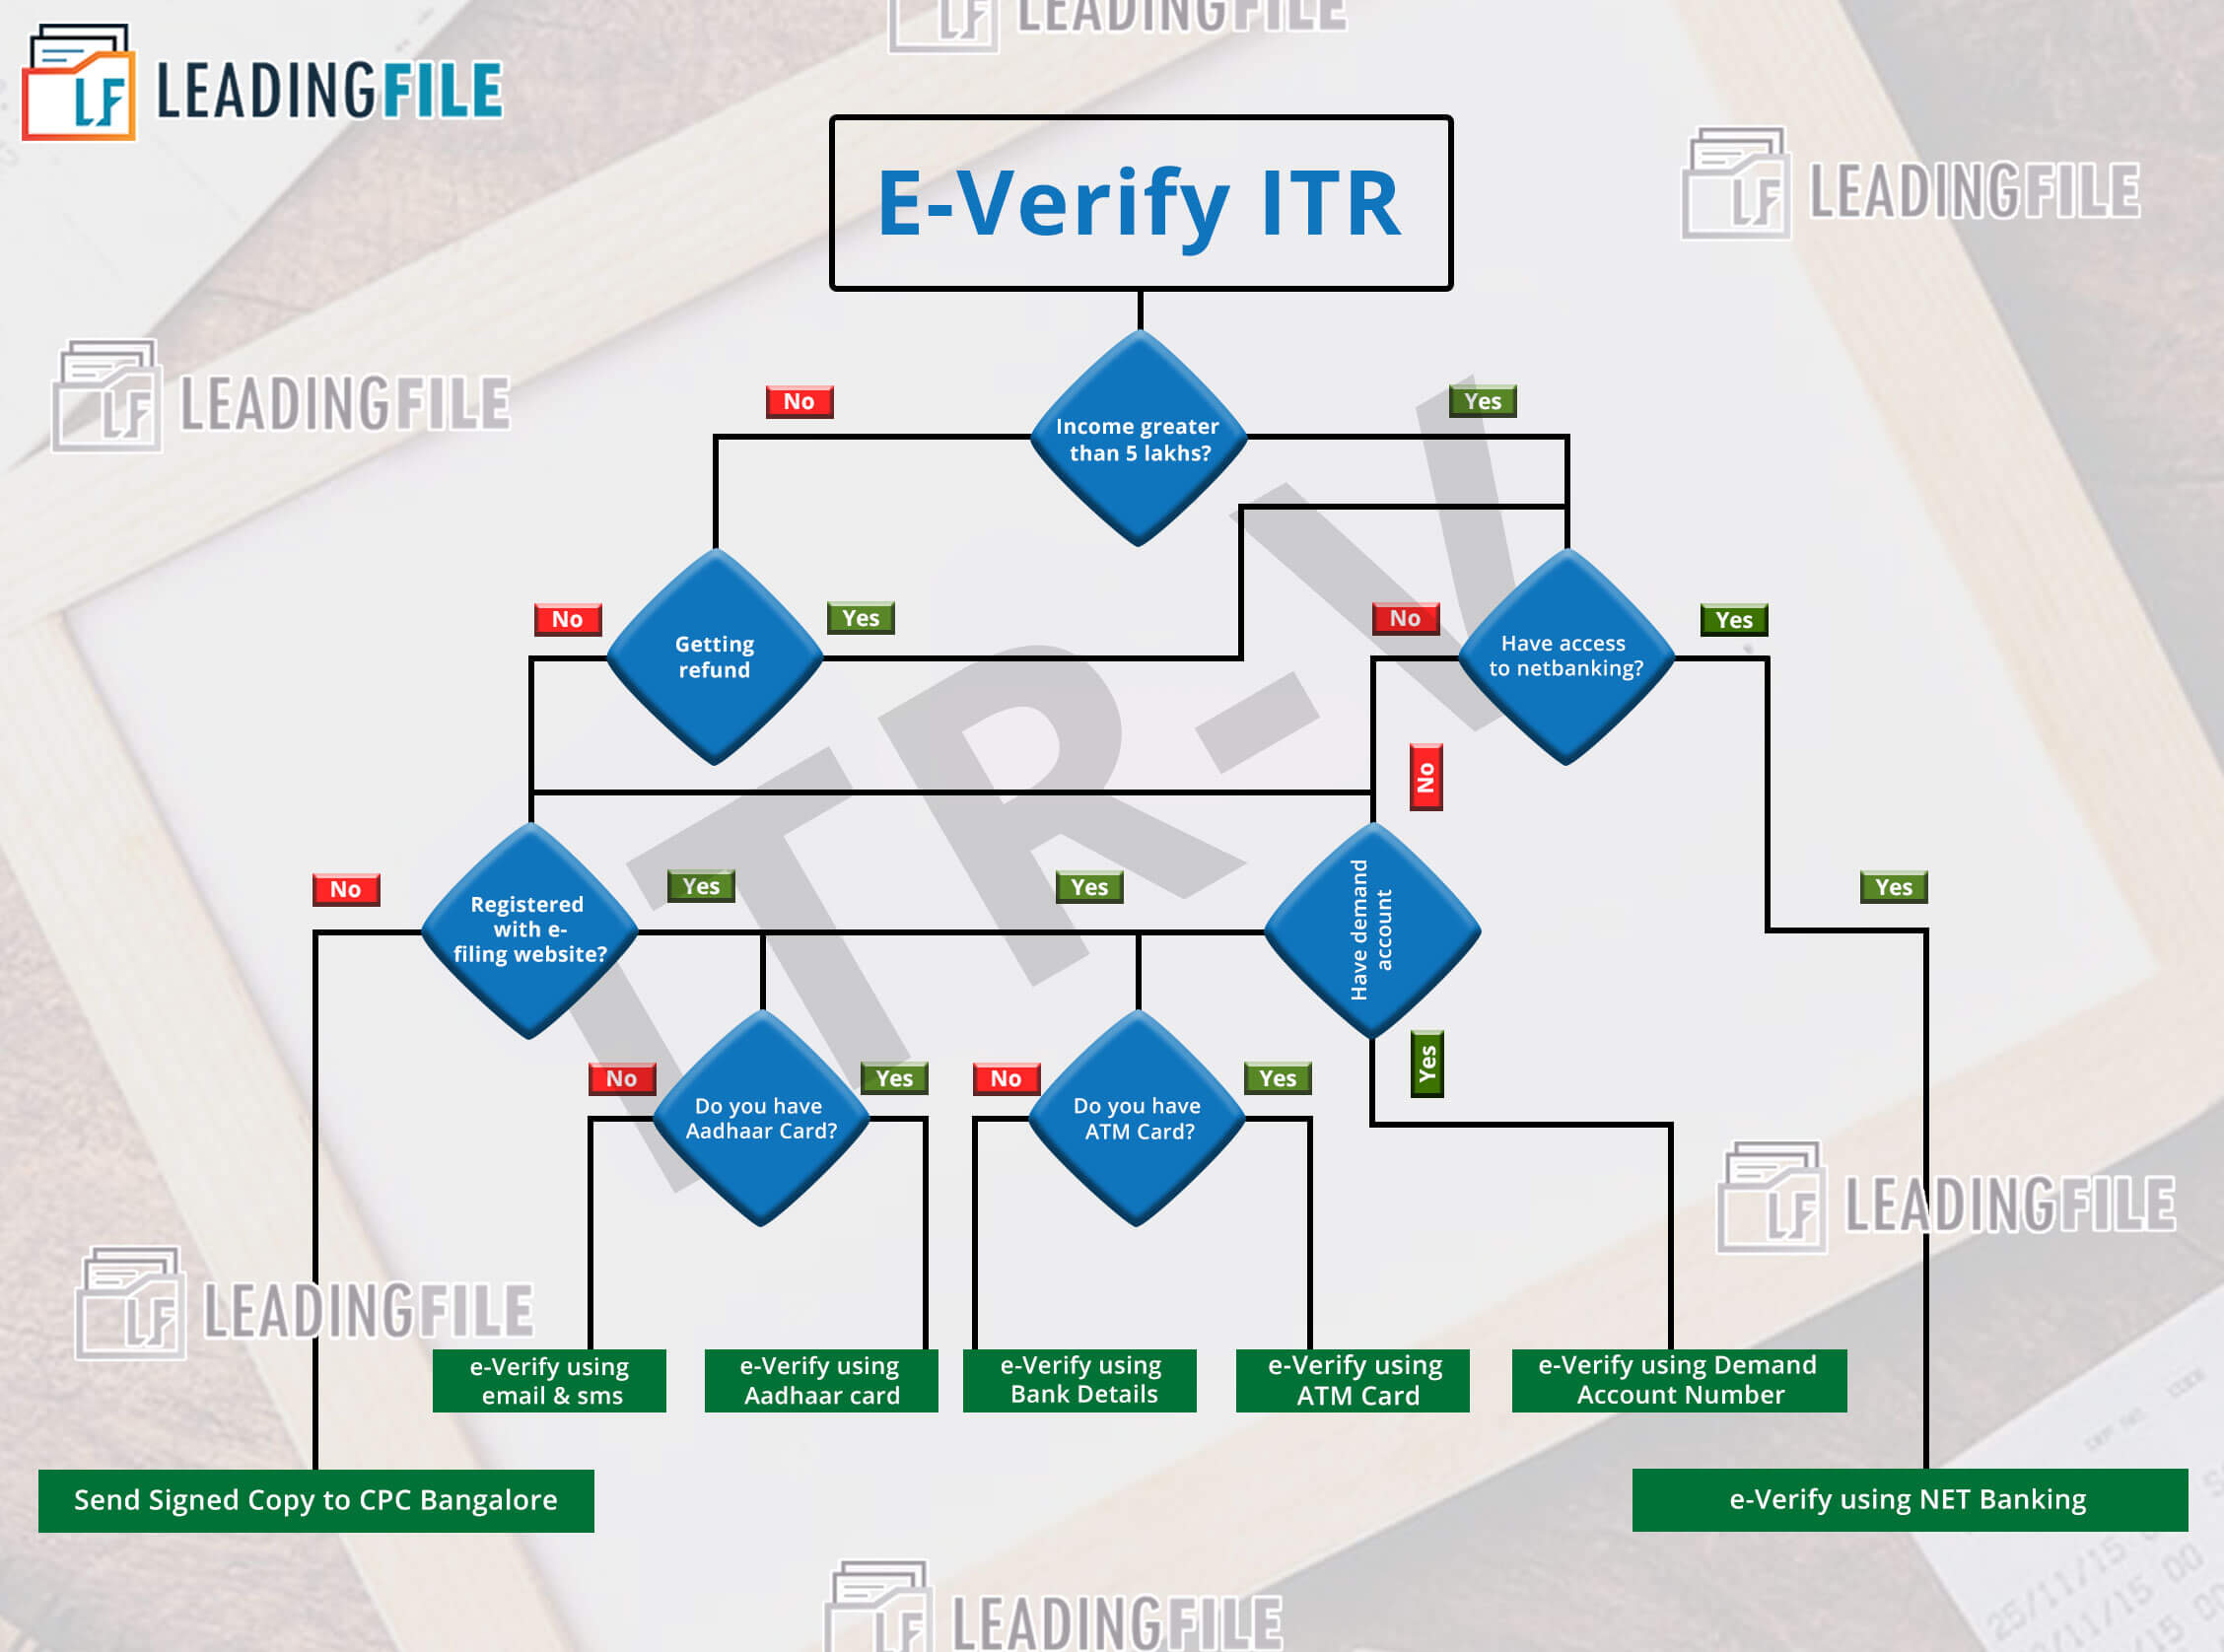
An infographic to understand the same questionnaire in better & native manner is attached below:
Here you got seven options/methods to move on for the E-Verification of ITR.
Despite the offline method (send a signed copy to CPC Bangalore), there are six (6) different options by which you can e-verify your ITR from the income tax department’s e-filing portal/website.
Opt the best suitable fits you!
Note: In accordance with DFD infographics, designed by CBDT, if the taxpayer’s total income is greater than 5 lakhs or if you’re getting any refund. Then the taxpayer’s are only provided with one option i.e “EVC – Through NetBanking”.
On the other hand, if the taxpayer’s total income is not greater than 5 lakhs and too didn’t get any refund then you may go along with any option despite the net banking.
However, in accordance with the same condition, for every method, you need to generate an EVC (Electronic Verification Code). By going through this statement, one might have a question in his/her mind i.e what is EVC and how it is generated?
Let’s begin the same…
EVC | What Is EVC Code To Verify ITR
EVC stands for the “Electronic Verification Code”!
Fast forward, it is an electronically generated 10 digits alphanumeric code, which is used to verify tax return.
For instance: [xxxxxxx235]!
Note: To the known facts – an electronic verification code is a one time password that can only be sent throughout the mail or sms, and will be valid till 72 hours only/-
Hence, before proceeding to generate EVC, please ensure that the email address and mobile number which is registered along with the CBDT is accessible to you.
Over next, CBDT (Central Board Of Direct Taxation) has notified 6 (Six) equivalent methods to generate EVC.
Before all, let’s have a look at the features and usage of EVC (Electronic Verification Code) to e-verify your ITR.
Features & Usage Of EVC To E-Verify Your ITR
Following are the very basic features & usage of EVC (Electronic Verification Code) for the e-verification of ITR:
01: It is an alphanumeric code which verifies the identity of the person filing the ITR. The person might be an individual as well as a HUF (Hindu Undivided Family).
02: Subsequently, the individual ones are required to self-verify their returns, whereas, on the other hand, the Karta must verify the returns of the Hindu undivided family.
03: Over next, EVC can be used to verify ITR 1 – Sahaj/ITR 2/ITR 3/ITR 4/ITR 4S -Sugam.
04: Although, it would be unique and can only be used with the PAN of the taxpayer furnishing the ITR. Somehow, this means one EVC for one PAN and even for one ITR. Whether it is original or revised ITR.
05: Concurrently, EVC remains valid for 72 hours but can be generated various times.
Now, let’s begin with the generation of EVC (Electronic Verification Code) and e-verifying of ITR (Income Tax Return) methods…
E-Verify ITR Through NET Banking: Step-By-Step Guide
In order to e-verify income tax return through net banking, please make sure that you have access to the net banking.
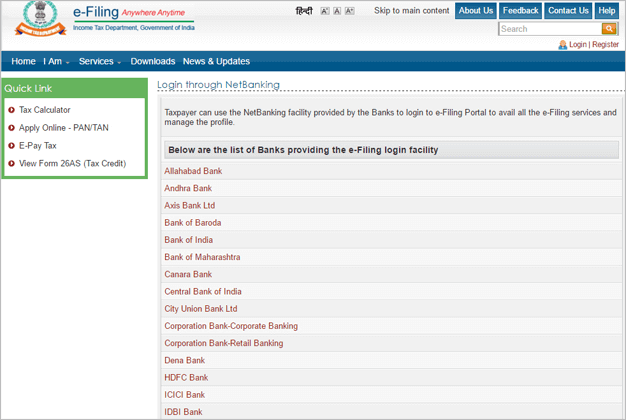
Meanwhile, you can only verify your ITR if you have availed the net banking facility of the particular bank account. Not all, only selective banks allow you to e-verify your ITR through net banking.
Note: As of now, the updated list says that the banks which provide the EVC generation facility are elaborated as: Allahabad Bank, Andhra Bank, Axis Bank Ltd, Bank of Baroda, Bank of India, Bank of Maharashtra, HDFC Bank, ICICI Bank, IDBI Bank, Indian Bank, Indian Overseas Bank, Kotak Mahindra Bank, Oriental Bank of Commerce, Punjab National Bank, State Bank of India, Canara Bank, Central Bank of India, City Union Bank Ltd, Corporation Bank-Corporate Banking, Corporation Bank-Retail Banking, Dena Bank, Vijaya Bank, United Bank of India and Union Bank of India.
Along all, let’s conclude the list of some most popular banks which allows the verification of ITR (Income Tax Return), elaborated as follows:
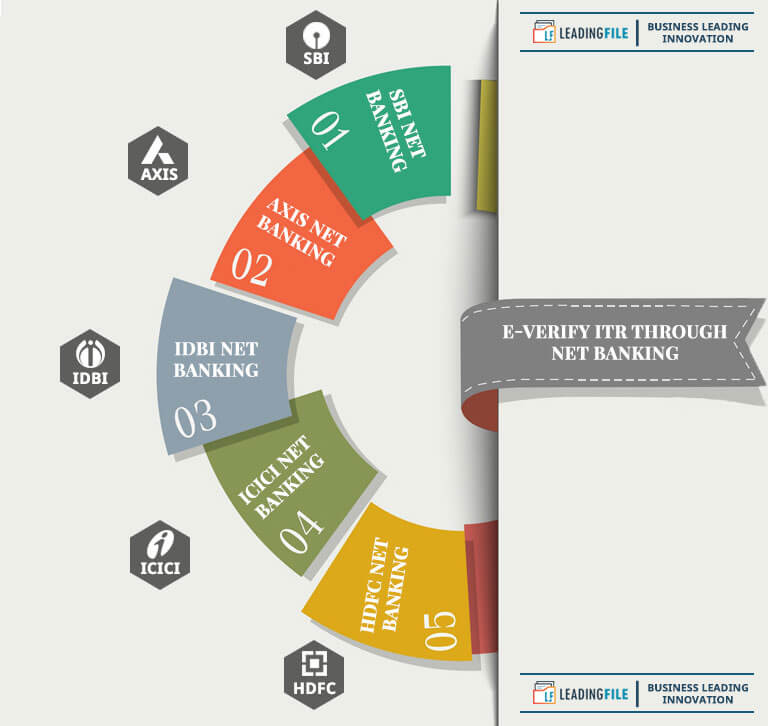
| 01: | SBI Bank Netbanking | 02: | Axis Bank Netbanking | 03: | IDBI Bank Netbanking | 04: | ICICI Bank Netbanking | 05: | HDFC Bank Netbanking |
Next, have a look at the complete guide, going throughout the steps to e-verify income tax by generating EVC, using net banking.
![]()
Visit Official Website
The very first step asks you to visit the official website. Hence, click here to visit the ITD’s e-filing website.
![]()
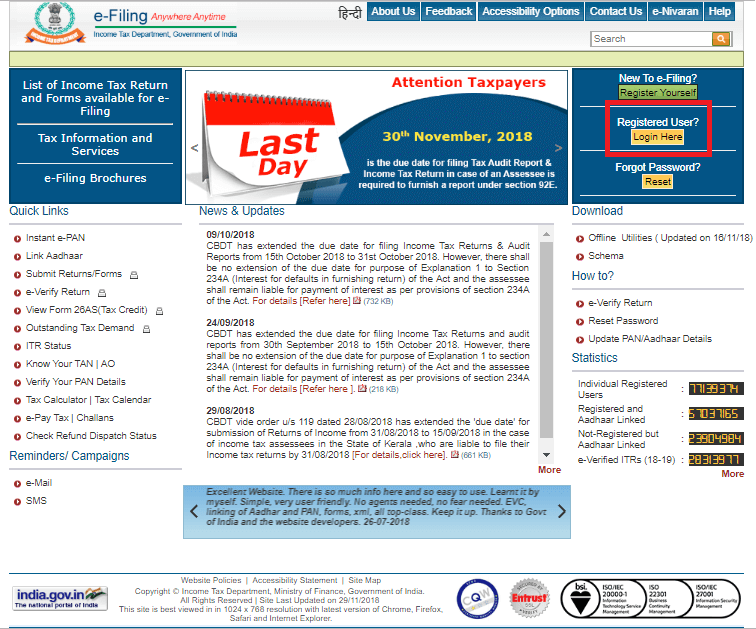
Login/Register To Your e-filing Account
Under this alternative, you need to login or register to your e-filing account.
Hence, find the “Login Here” or “Register Yourself” button on the top right corner and click on the respective one. This somehow means that, log in if you hold an account. Whereas, register if you don’t have an account.
An image to make the step understandable is as follows:
![]()
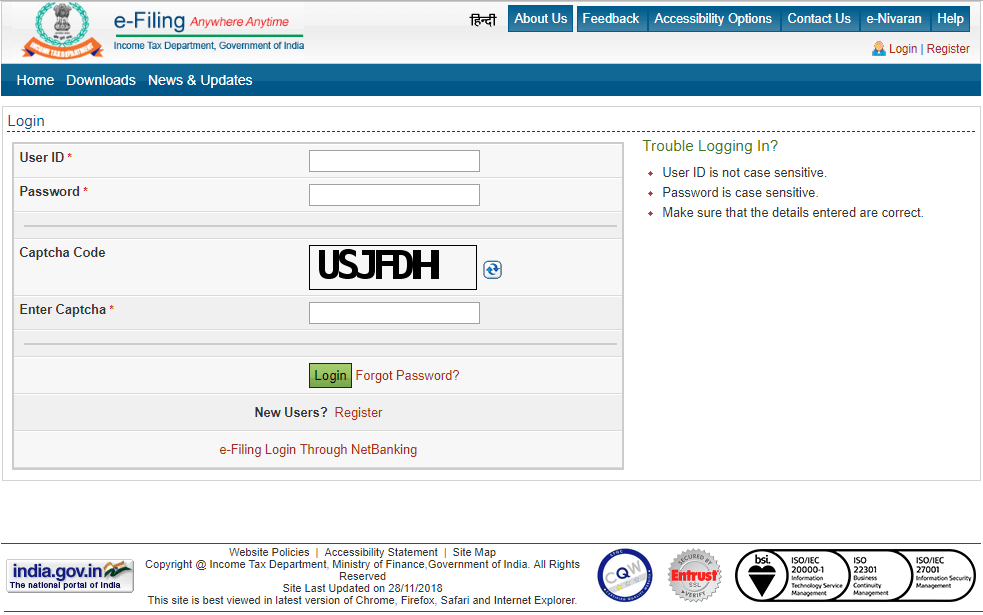
Assign The Required Details
This alternative step needs to be picked just after clicking over “Login Here” button.
Under this, you need to assign the required details. For instance: “User ID” (i.e, your PAN card number) and “Password” (i.e, together; your PAN card number and date of birth) along with the “Captcha Code” (i.e, provided under the blank box).
Finally, to continue – press over the “Login” button.
An image to illustrate the same is as follows:
![]()
Click: View Returns/Forms
Next to step third, a page will pop up as your account dashboard!
To which you will see a button naming “View Returns/Forms”. Go along with the same button…
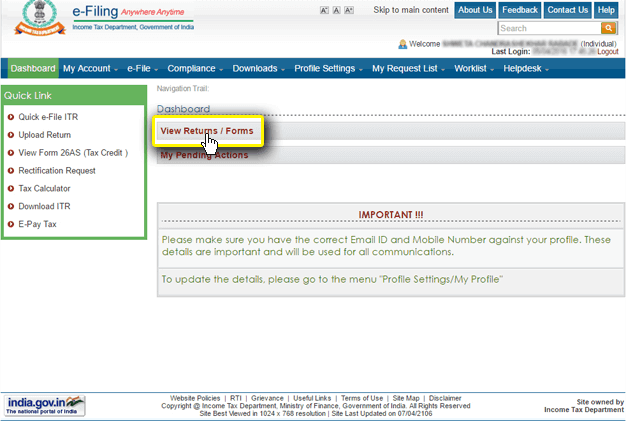
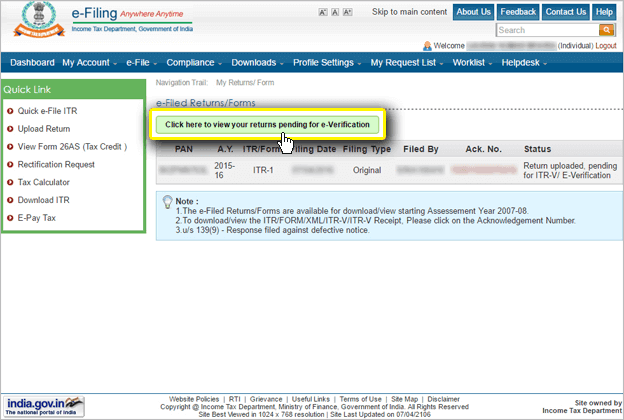
By clicking over: View Returns/Forms, you will face an e-filing website page named; e-filed returns/forms. And over this page, you will find a button naming “Click here to view your returns pending for e-verification”.
Go along with the same tag…
An image to represent the same step is as follows:
![]()
Go Along With e-Verify Tag
After going through step fourth, you will get a list of returns pending for the e-verification.
Henceforth, to e-verify your ITR click over “e-verify” tag which is depicted next to your pending returns. Have a glimpse of the image representing the same…
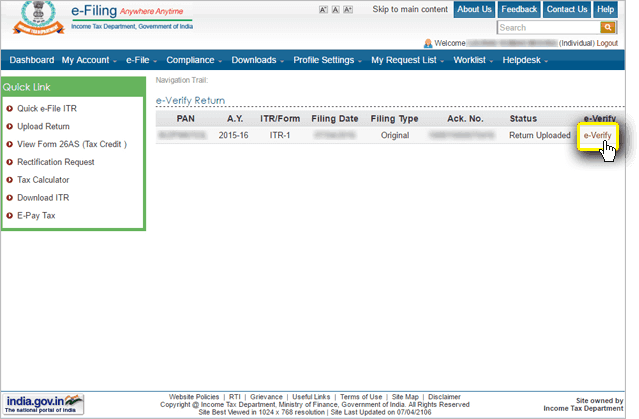
![]()
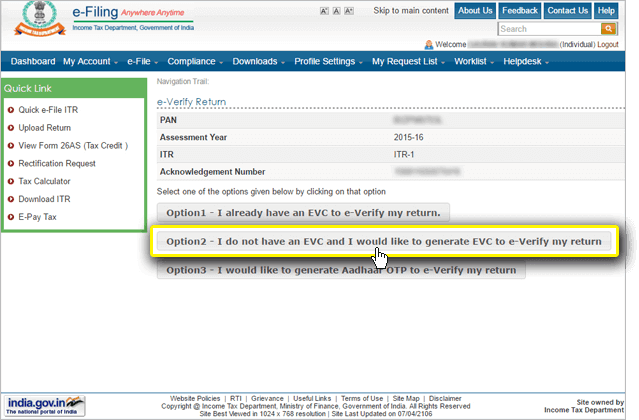
Generate EVC
This alternative comes with the three info taglines! First is – I already have an EVC, second is – I do not have an EVC and I would like to generate an EVC and the last one is – I would like to generate aadhaar OTP.
Among these, you need to select the option 2 tagline i.e, “I do not have an EVC and I would like to generate EVC to e-verify my return”.
An image representing the same is as follows:
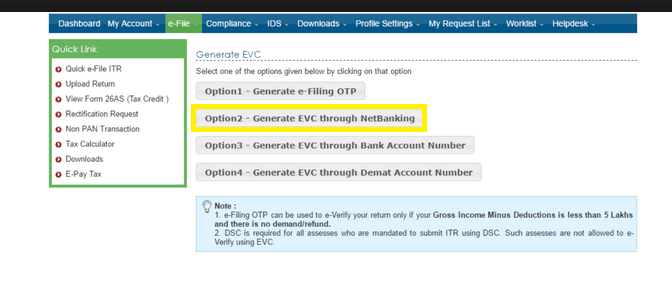
Next to this, a new page will pop up where you will be required to select the on-going option.
Among all, you will find “Generate EVC Through NetBanking” option. Go along with the same…
Image to illustrate the same is as follows:
By opting the option 2, you will be redirected to the list of banks through which you would like to go for Net Banking.
Image to represent the same is as follows:
Next to selecting, an EVC will be generated!
![]()
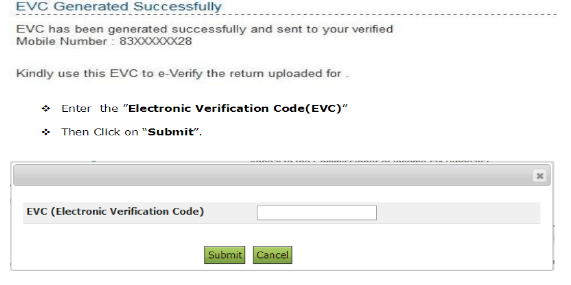
Enter & Submit EVC
Upon successfully generating the electronic verification code through the desired bank, enter the same code and press over “Submit” button.
Have a look at the image to understand the things in a better and native manner.
 All done!
However, in the faith of successfully completed e-verification of your ITR, a confirmation message will be displayed with a transaction ID and EVC code. Further on, to download the ITR-V acknowledgement, click over the green button.
Fast forward, if you’re not familiar with the above-shown method, then, e-verify through aadhaar card. Depicted as…
E-Verify ITR Through Aadhaar Card: Official Guide
Under this alternative, you can file your returns online with the help of aadhaar card!
Yes-Yes-Yes || You heard it right. Now, you can E-Verify ITR, online with the help of your aadhar card.
Meanwhile, this was another step from the government towards time-saving and going green. To which they introduced the aadhaar e-verification method and named it; e-verify ITR through aadhaar card.
So, the taxpayers no longer have to send the ITR-V form to the income tax department in Bangalore. Despite, they can verify their ITR online by generating an EVC.
But, in order to e-verify your ITR through aadhaar card, please make sure that your aadhaar card is linked to your PAN Card.
Before all, follow out these steps to link your aadhaar card to ITR as well as PAN Card.
Let’s begin…
![]()
Visit Official Website
Go along with the text in blue: ITD’s e-filing website.
Once you click over the anchor text, you will face the e-filing official website. To which you need to find the “Login Here” or “Register Yourself” option.
An image to make the things quite easy is as follows:
By following the “Login Here” button, you will be required to provide the necessary credentials.
Fill out with the same amenities which we have discussed very before.
![]()
Link Aadhaar Card
As soon as you log in, a pop up will appear, asking you to link your aadhaar number with your e-filing account.
An image illustrating the pop is as follows:
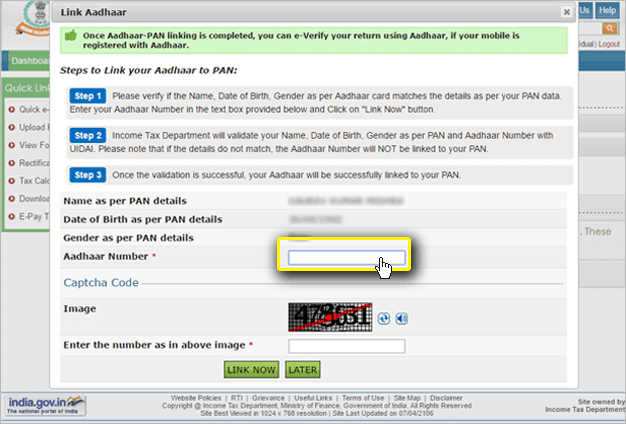
At the same popup, you will have a glimpse of the steps to link your aadhaar to PAN.
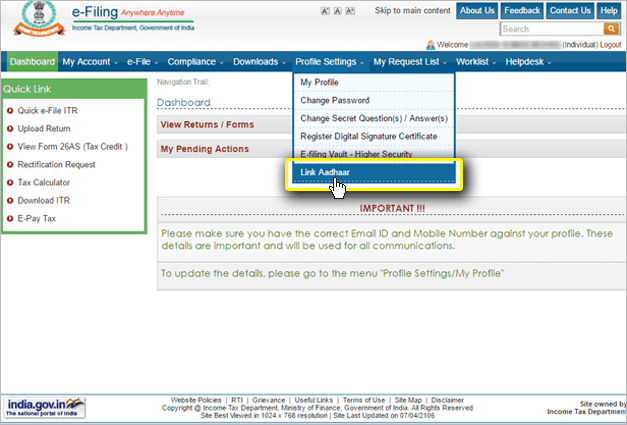
And if you don’t see any popup screen, then visit the dashboard and look for the blue tab named – (Profile Settings), located at the top bar of the official website. By clicking over that, you will get a menu list to which press over “Link Aadhaar”.
Once you click over it, a new window will pop up – asking you to provide the following credentials. Elaborated throughout an image as follows:
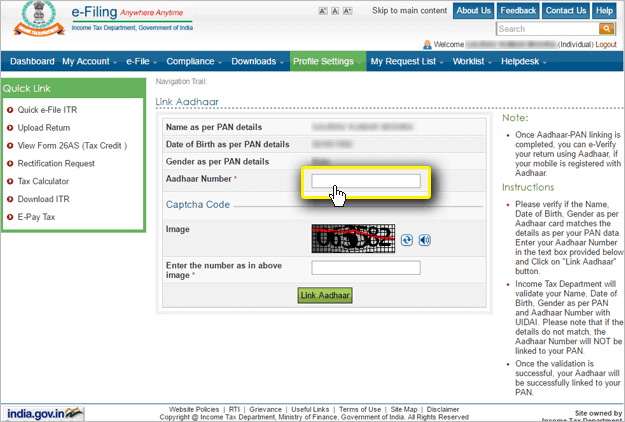
Next to filling the required credentials, click over the “Link Aadhaar” button. As soon as you click, a validation will be made and thereafter your aadhaar number will be linked to your PAN.
Finally, once your aadhaar card got linked to your PAN, you can proceed to e-verify your ITR through aadhaar card.
Moreover, for the sake of e-verification of ITR (Income Tax Returns) through aadhaar card, follow out the steps…
![]()
Visit Dashboard
Under this alternative, you need to visit the dashboard of the IT (Income Tax) department website.
So, log in to the website and look for the “My Account” button.
By clicking over the same, you will be facing a drop-down menu list, to which you will find “e-Filed Returns/Forms”.
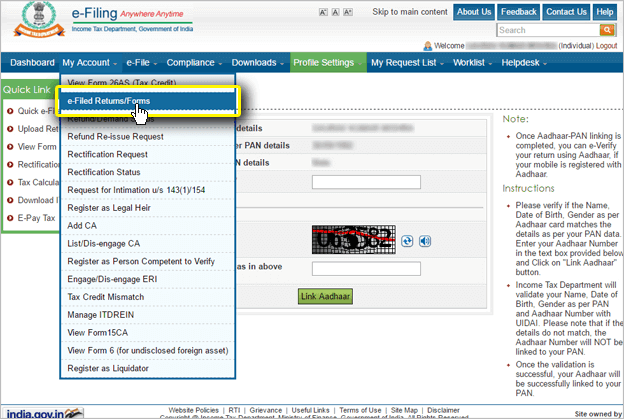
Select the same, this will last long to a screen, elaborated as follows:
To this screen, you will find an option “Click here to view your returns pending for e-verification”. Fast forward, to view all the pending returns select the same.
![]()
Click: E-Verify Tag
On the way to e-verify your ITR through aadhaar card, the next step is to e-verify the pending returns which we just turned on in the above step.
An image representing the pending return is as:
To each pending return, you will find an option to e-verify it. However, by clicking over “e-verify” button, you will be redirected to the page – representing the manners to e-verify ITR.
Let’s have a view of the manners of ITR e-verification…
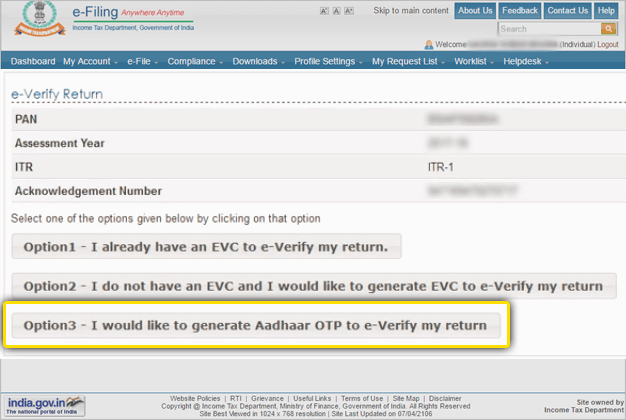
Among all, you have to select the last one option i.e, – (I would like to generate aadhaar OTP to e-verify my return).
Just after selecting the same option, you will receive an sms or email, holding the OTP (EVC). Hence, before selecting, please ensure that your mobile no is linked to your aadhaar number.
The time you receive the OTP/EVC, note down the same and type it within the blank space, provided on the following page. Thereafter, proceed for downloading ITR-V.
If you’re not very well aware of same, then, click visit our blog on same by clicking over the blue text: downloading the ITR-V form.
All done! Congratulation, you have successfully completed e-verification of your ITR through Aadhaar card.
Well, if you find the method inappropriate then visit our next manner of e-verification through bank account number.
E-Verify ITR Through Bank Account Number
Banks are not just to deal with debit & credit, they too can help you will ITR E-Verification.
So, this time here we are with a guide to E-Verify ITR Through Bank Account Number.
Yes — In accordance with the income tax department, you can e-verify your returns through bank account details.
Note: To the known fact – this facility is available for the few banks only/-
Hence, check if your bank offers you the facility of e-verifying ITR. Visit the list here: Bank’s List Which Offers The Verification Of Return.
Henceforth, follow the steps to e-verify the income tax return using a bank account.
Easy Steps to E-Verify ITR Through Bank Account Number
Like other alternatives belonging to the e-verification manner, the steps to e-verify your ITR using bank account details is as follows…
![]()
Visit Official Website & Log In
At first, we need to visit the IT department official website & login into the same. However, if you don’t have an account then visit the option “Register Yourself”.
Next to this, one needs to view his/her returns/forms.
![]()
Select: View Returns/Forms
By logging in to the e-filing account, you need to select “View Returns/Forms” option.
An image illustrating the step menu is as follows:
Upon selecting the same, you will be redirected to the pending returns. There out, like other alternative e-verification manner steps, press over e-verify.
This will take you to the e-verification methods. An image representing the same is as:

Here, you need to select the option 3: Generate EVC through bank account number. Over to next, you will be required to select the bank and pre-validate the same.
![]()
Pre-Validate Bank Account
To verify your ITR by using bank account number, pre-validate it!
Further on, for the sake of pre-validation – navigate the path shown below:
Go to your e-filing account dashboard >> profile settings >> select bank >> enter the required details (like – bank’s name, account number, IFSC code and mobile number) >> select “Pre-Validation”.
An image illustrating the same is as follows:
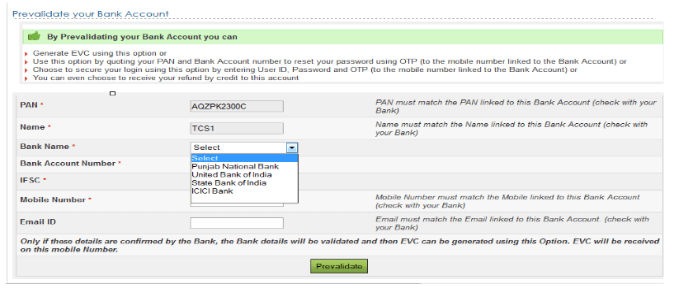
Must remember that you are required to enter your mobile number and name which is henceforth with your bank’s records.
Upon selecting the “PreValidation” button, a pop up will appear – as…
![]()
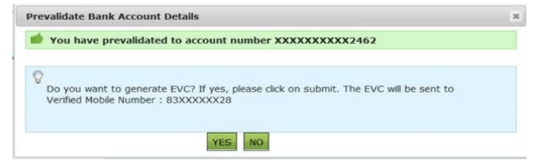
Generate & Submit EVC
Fast forward, once the pre-validation is done, it will ask you if you wish to generate the EVC or not. To which you need to select the option “YES” or “NO”, respectively.
However, by visiting YES, you will be receiving an email or sms, containing EVC.
From there out, you need to type that EVC within the box. An image to make the things understandable is as follows:
Upon typing the EVC, press over the submit button.
All done!
At last, you will see a success message (Return successfully e-verified) popup.
Now you can download the ITR-V Acknowledgement.
Congratulation! @ you have successfully e-verified and downloaded your income tax return.
Next, if you don’t find the e-verification through bank account number manner appropriate, then visit the next method i.e, e-verify ITR through demand account number.
E-Verify ITR Through Demand Account Number
Somehow it means that you’re a demand account holder. And more likely willing to e-verify ITR through demand account number.
In the modern era of verification, E-Verify ITR Through Demand Account Number isn’t just a name; it’s a never-ending online process.
However, this demand is not to draft only, it’s to E-Verify ITR too!
Well, this method is not overall but 99% similar to the bank account based ITR validation.
Getting into the depth of validation, after you’ve successfully filed your income tax return, the next thing is to verify it! And to make the verification things easy for you, the IT department has allotted two option. First is – electronically and the other one is physically (i.e By sending signed ITR-V to CPC, Bangalore).
Subsequent to this, the income tax department starts processing your return when it got verified.
Now, let’s consult the detail of first e-verification method i.e, electronically e-verify ITR through demand account number.
Steps to E-Verify ITR Through Demand Account Number
The steps representing the e-verification of ITR via demand account in detail is as follows:
![]()
Visit Official Website & Log In
Similar to that of above-illustrated amenities, one need to first visit and log in to the e-filing official website.
However, if you don’t have an account then click over “Register Yourself” button.
Throughout the credentials, you can log in to the account. Image to represent the route is as:
Later, one must view his/her returns/forms. Detail about the same is within the corresponding heading.
![]()
Click Over: View Returns/Forms
Under this alternative, you need to find and press over to the view returns/forms link. An image depicting the same is as follows:
Next to opting the view returns/forms, a new window will pop up illustrating the overall returns. There you need to find and click over the – “Click here to view your returns pending for e-verification”.
Navigation image is as:
By clicking over it, you will be able to see all the pending returns. Fast forward, along with each pending return, you will see an “e-verify” link button. Clicking over it will lead to the following screen, illustrated as:
 Finally, you need to select an option and deal with the generation of EVC. but, before that, you must pre-validate your demand account which is done throughout the next heading.
![]()
Pre-Validate Demand Account
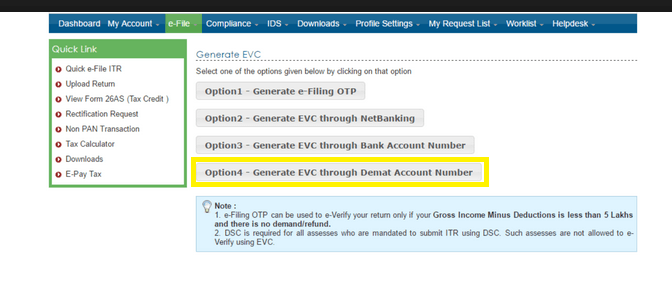
By selecting option 4 i.e, generate EVC through demand account number, you will be redirected to the pre-validation of the demand account.
In other words, to generate EVC, one first need to prevalidate his/her demand account. However, if the demand account is not already pre-validated, then a screen will appear as shown below:
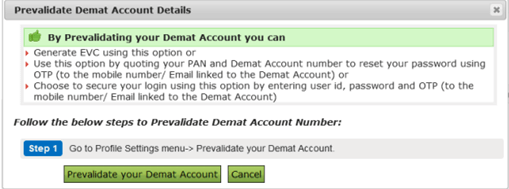
Here, one needs to click over “Prevalidate Your Demand Account” button. Once you click over it, the following screen will appear, illustrated as:
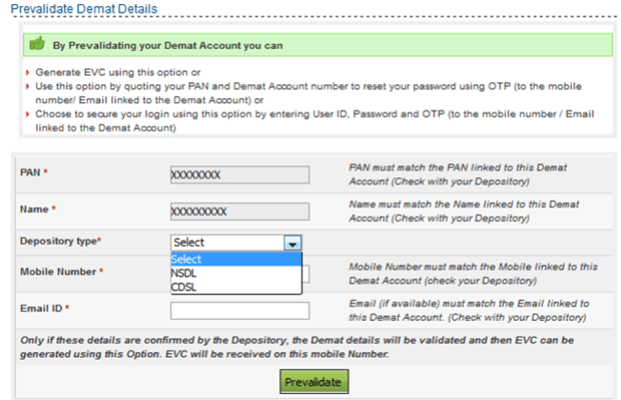
To this screen, you need to fill your PAN number, account name, mobile number, e-mail Id and depository type. Further on, the depository type holds two option, one is; NSDL – which will ask you to provide the DP Id, mobile number, e-mail Id and client Id.
On the other hand, the second option is; CDSL – it will ask you to provide the demand account number, mobile number and email Id. At last, by entering the particular information, you need to press over “Prevalidate” button.
![]()
Generate & Submit EVC
Once the validation is done, the success message will appear.
An image illustrating the same is as follows:

This will ask you whether to generate the EVC or not, by allotting two buttons “YES” & “NO”.
Upon selecting yes, you will be sent an EVC (Electronic Verification code) over your registered e-mail id or mobile number. Remember that the EVC is only valid until 72 hours.
Next to this, enter the received EVC and click over the “Submit” button. To understand the phase in an easy & native manner, visit the image illustrating the same:
Just after clicking over the submit button, you will see a success message i.e, return successfully e-verified. Now you too can download your ITR-V acknowledgement.
All done! Hope this will work out for you! If not, then go along with our new e-verification methods i.e, e-verification of ITR using ATM.
E-Verify ITR Through ATM Card
ATM Card! Somewhat not just to withdraw money, it too can help you with E-Verification of your ITR.
Yes-Yes-Yes || You heard it right. Now, you can E-Verify ITR, online with the help of your ATM Card!
In this digital world, directed by our prime minister — Mr. Chowkidar Narendra Modi, E-Verify ITR Through ATM Card isn’t just a name; it’s is a never-ending online process.
Well, to e-verify ITR via ATM card is not a big deal!
But, is a contrast of physical and electronic verification.
In other words, it is a long process which involves a particular bank’s ATM and thereafter formal verification process.
Let’s begin from the beginning…
Now-a-days, you can e-verify your ITR through ATM card. But, to the known facts – the facility to generate code is allotted by selective bank’s ATM only/-
Let’s deal with the list of these selected bank ATM’s.
| 01: | IDBI Bank | 02: | ICICI Bank | 03: | Canara Bank |
| 04: | State Bank of India | 05: | Axis Bank Ltd | 06: | Central Bank of India |
So, one can only e-verify his/her ITR, if s/he holds the ATM of the listed bank. But, the condition list didn’t end here, s/he must have an ATM card of a PAN validated account.
Fast forward, if you are done with these conditions, then, keep going along with the steps illustrating the e-verification made throughout the ATM card.
Easy Steps To E-Verify ITR Through ATM Card
Following illustrated are the easiest steps to do the same:
![]()
Visit Particular ATM
Under this alternative, one needs to visit the particular ATM!
Somehow, this means that you need to visit that particular ATM which is listed above and connected to your bank’s ATM only.
After visiting the same, one needs to swipe his/her debit/credit ATM card. Later to swiping, you will face a screen holding few options. Among all you have to find and click over – “Pin for e-filing or Generate EVC for Income tax Filing” option.
Just after clicking over it, an EVC will be generated and sent to your registered mobile number. Must remember that for e-verifying you ITR, you’ve to use that EVC within 72 hours only.
So, to make use of it, follow out the illustrated steps.
![]()
Visit Official Website
Once the EVC is to you, you need to visit the official e-filing website.
Thereafter, login to your account, else, if you don’t have an account then visit the “Register Yourself” button.
Later to this, log in with the aligned credentials.
Once you are logged in, a dashboard screen will be up to you. Over to which you need to follow the illustrated navigation, which is as: Dashboard >> My Account >> e-Filed Returns/Forms.
An image representing the same is as follows:
Next to this, a screen will appear in front of you, illustrating your returns. Over to which, you will find a link below; “Click here to view your returns pending for e-verification”.
Image representing the same is as follows:
![]()
Click Over: E-Verify Tag
Once you click over it, you will be facing all your pending returns. Not only pending returns but the last longing link also, which will help you in e-verifying your particular pending return.
Image representing the same step is as follows:
Just after visiting the last longing tag, you will be redirected to the screen from where you have to select the EVC generation method. Have a view of the same…
![]()
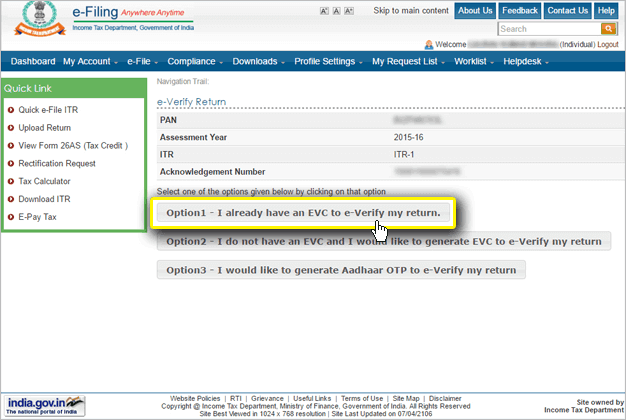
Generate & Submit EVC
Under this alternative step, you will face three to four options, in the faith of generating EVC. But you need to go along with the option – 1 only/- i.e, “I already have an EVC to e-Verify my return”.
Image illustrating the same is as:
Upon selecting the first option, you will be redirected to the EVC submit option menu page.
Image depicting the same menu page is as:
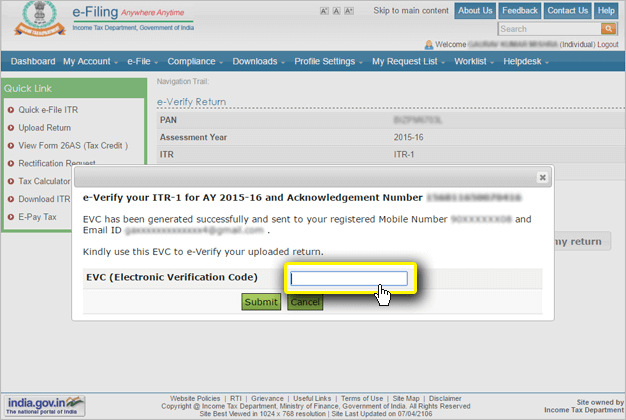
To this menu page, type the 10 digit alphanumeric EVC which you have received over your mobile number and later to keying press the “Submit” button.
All done!
However, if you found the verification manner appropriate then visit the next e-verification method i.e, e-verification of ITR by using e-mail Id & mobile number.
E-Verify ITR Through E-mail ID & Mobile Number: Step-By-Step Guide
What you think your E-mail ID & Mobile Number is just to receive and send emails, messages and calls. No, they too can help you with E-Verification of your ITR.
Yah! You heard it right. Now, you can E-Verify ITR, online with the help of your E-mail ID & Mobile Number.
In saying — The final e-verification method!
Well, this method of verifying ITR [e-verifying ITR through e-mail Id & mobile number] can only be used if a taxpayer satisfies the following illustrated criteria;
- Income below then Rs, 5,00,000 and
- Do not attain a refund.
Fast forward, if you satisfy both the criteria, then only, you can generate EVC directly from the ITD’s e-filing website.
Thus, this is what we are elaborating here! Keep going, the steps representing the verification process is as…
![]()
Visit Official Website
Like other alternatives, at first one need to visit the ITD’s e-filing website.
But the task didn’t end here!
Later to this, s/he needs to find the “Login Here” button. However, if you hold an e-filing account, then you need to go along with same. Else, visit the first and foremost button i.e, “Register Yourself”.
An image to illustrate the same is as:
Just after login, select the “View Returns/Forms” link. Illustrated below throughout an image:
The second you click over it, the next second you will be facing all your returns. But, the returns which have verified. Now, you must be thinking – then where the pending returns are?
For the sake of pending returns, follow out the next step…
![]()
Select: Click Here To View Your Returns Pending For E-Verification
Under this alternative, you need to select the corresponding heading text link i.e, “Click here to view your returns pending for e-verification”.
An image illustrating the same is as follows:
Just by click over this, you will be viewing all your pending returns along with an e-verify tab. Elaborating the e-verify tab working in detail…
![]()
Click Over: E-Verify Tag
In general, just by clicking over it, you will be able to e-verify your particular pending ITR (Income Tax Return).
An image representing the same tag is as follows:
Next to this step, one needs to generate an EVC. The step doing so is as follows.
![]()
Generate & Submit EVC
The time you turn out of step third, you will be asked to generate an EVC throughout 2 major options. Illustrated via an image, as follows:
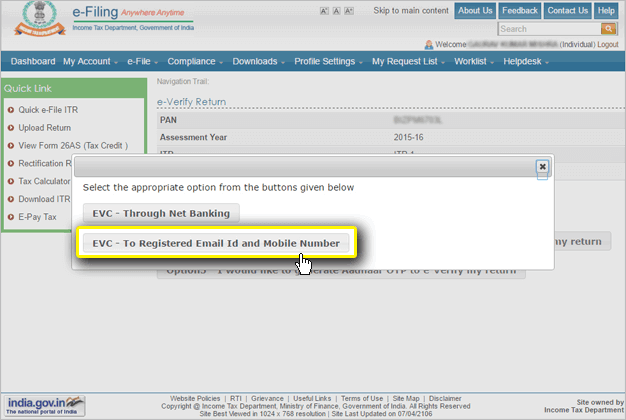
Here, you need to go along with the option 2 i.e, “EVC – To Registered E-mail Id and Mobile Number”. Just after clicking over this option, you will receive an EVC over the registered e-mail id or mobile number.
The only task you need to perform after receiving EVC is to enter that code into the blank box, as follows:
Later to keying EVC, press over the “Submit” button.
Great! You have successfully completed e-verification of ITR.
Wind-Up
The utmost important phase of any of the blog post!
This was all, which one needs to understand about E-Verify ITR (Income Tax Return) in bold. Moving on – here in this blog, we have discussed all the thesis of 6 quick methods to – online ITR e-verification.
Likely to be contained: methods to verify ITR through NET banking, aadhaar card, bank account number, demand account number, ATM card and e-mail Id & mobile number.
As we all know that dealing with the above-illustrated thesis is not a doodle, but here we made the dreams come true. Subsequently, this adds value to any of the blog posts and often leads to the end of our blog post.
All done! Enjoy and don’t forget to comment. Also, share the blog with your peers. You are on your way of getting more & more exposure.